So, you want to turn your passion for photography into a career in real estate? It’s a fantastic field that perfectly blends technical skill with a real understanding of what makes a home look its best. It’s not just about snapping pictures; it’s about capturing a property’s story in a way that gets buyers excited.
Your Path From Passion to Professional Photographer

If you're asking how to become a real estate photographer, you’ve come to the right place. The demand for eye-catching property photos has absolutely exploded, opening up a massive opportunity for photographers who can deliver the goods.
Think of this guide as your complete roadmap. We're going to break down the entire journey, from mastering your camera to landing those crucial first clients. No fluff, just the actionable advice you need to build a real, sustainable business from the ground up.
Why Real Estate Photography Matters Now
The opportunity in this niche is bigger than ever. Great visuals don't just look nice—they make a measurable difference. High-quality images can boost a home's perceived value by as much as 39%, and properties shot by a pro tend to get a 47% higher asking price per square foot.
It’s all about grabbing attention. Potential buyers spend 60% of their time on a listing just looking at the photos. And it pays off for the agents, too—those who hire professional photographers earn roughly twice the commission. These real estate photography statistics really drive home the impact you can make.
This guide will walk you through the gear that actually makes a difference, the shooting techniques that agents are looking for, and the business strategies that ensure you get paid what you're worth. Let's start by looking at the big picture—the core phases of your journey.
Your job as a real estate photographer is to make it as easy as possible for clients to get the photos they need. They aren't looking for works of art; they want technically correct, accurate photos that show a property at its best.
Your Roadmap from Aspiring to Professional
Building a successful business doesn't just happen. It's a process, a journey through distinct stages. Knowing what to focus on at each step keeps you from getting overwhelmed and helps you make real, steady progress. This table lays out the path ahead.
| Phase | Key Focus Areas | Primary Goals |
|---|---|---|
| Foundation | Learning essential camera settings, mastering composition, and practicing editing techniques. | Develop technical proficiency and a consistent visual style. Build a small starter portfolio. |
| Business Setup | Choosing a business name, setting up your website, and creating pricing packages. | Establish a professional identity and create a clear service offering for potential clients. |
| Client Acquisition | Identifying target clients, local market outreach, and networking with real estate agents. | Secure your first few paying clients and begin building a reputation in your area. |
| Growth & Scaling | Refining workflows for efficiency, adding new services (drone, video), and managing client relationships. | Increase your income, build a steady stream of recurring work, and expand your service offerings. |
Each of these phases builds on the last, taking you from learning the ropes to running a thriving business. Let’s dive into the first, and arguably most important, phase: getting your gear and skills dialed in.
Building Your Real Estate Photography Toolkit
Getting into real estate photography isn't about buying every gadget on the shelf. The truth is, you can produce incredible, high-end images with a surprisingly modest setup. It's all about knowing what gear truly matters and how to use it. Your goal is to build a reliable toolkit that helps you capture the bright, sharp, and inviting photos that make listings pop.
Let's start with the heart of your kit: the camera. It's easy to get bogged down in the "full-frame vs. crop sensor" debate. Full-frame cameras, with their larger sensors, are fantastic in low light and capture a wider dynamic range, but they come with a hefty price tag.
Honestly, a modern crop-sensor (APS-C) camera is more than capable of delivering professional-quality work. You can absolutely build a thriving business with one and upgrade down the line when it makes financial sense. Don't let gear snobbery hold you back.
The Non-Negotiable Lens and Tripod
While the camera body is flexible, a wide-angle lens is not. This is the single most important piece of glass you will own. For a full-frame camera, you'll need something in the 16-24mm range; for a crop-sensor, look for the 10-18mm range.
This lens is your secret weapon for making rooms feel open, airy, and spacious without creating that weird, distorted "funhouse" look. It lets you back into a corner and capture the entire room, giving potential buyers a genuine sense of the home's layout and flow.
Right alongside your lens in importance is a sturdy tripod. This is about more than just avoiding camera shake. A rock-solid tripod is essential for the bracketing and blending techniques that define professional real estate photography. It guarantees every frame is perfectly aligned, which is a lifesaver when you're in post-production blending multiple exposures. Skimping here will only lead to headaches.
Mastering Light Without Breaking the Bank
Great lighting is what separates the pros from the amateurs, but you don't need a truckload of expensive strobes to get started. Often, your best friend is the natural light already pouring into the property.
Learning to work with and shape ambient light is a foundational skill. To supplement it, an external flash (or speedlight) is the perfect entry point. It’s incredibly versatile.
- Bounce the flash: Pointing your speedlight at a white ceiling or wall turns that surface into a huge, soft light source, filling the room beautifully and killing harsh shadows.
- Create flash composites: You can take one shot exposed for the room's natural light (especially the view out the window) and a second shot with a pop of flash to illuminate the interior. You then simply blend them together in your editing software.
This simple one-light setup is a workhorse. Countless pros rely on it every single day. For a deeper look at specific models and more advanced setups, check out our complete guide on the essential gear for real estate photography.
Pro Tip: Don't get caught in the trap of "gear acquisition syndrome." I've seen photographers with basic equipment create absolute magic because they've mastered composition and light. Focus on your skills first, and let your gear purchases follow.
Essential Gear Comparison Budget vs Professional
To help you figure out where to put your money, here’s a quick breakdown of how capable entry-level gear stacks up against the professional standard. Remember, the "budget" options are more than enough to get you hired and produce fantastic results.
| Gear Category | Budget-Friendly Option (Example) | Professional Standard (Example) | Key Consideration |
|---|---|---|---|
| Camera Body | Canon Rebel Series, Nikon D3500 (APS-C) | Sony a7 IV, Canon R6 (Full-Frame) | Full-frame offers better low-light performance, but a crop sensor is a fantastic starting point. |
| Wide-Angle Lens | Canon EF-S 10-18mm, Tokina 11-16mm f/2.8 | Canon RF 15-35mm f/2.8, Sony 16-35mm GM | A wider aperture (e.g., f/2.8) is helpful but not essential, as you'll often shoot at f/8-f/11. |
| Tripod | K&F Concept, Manfrotto Befree | Manfrotto 055 Series with Geared Head | Stability is paramount. A geared head allows for precise, micro-adjustments to your composition. |
| Lighting | Godox TT600 Speedlight | Godox AD200Pro Strobe | A basic speedlight is sufficient for most interiors. A more powerful strobe is useful for large spaces. |
Ultimately, the best gear is the gear you have with you and know how to use. Start smart, practice your craft, and you'll be well on your way to building a successful real estate photography business.
Mastering Your On-Site Shooting Techniques
Got your gear? Great. Now comes the part where you actually make the magic happen on-site. This is where your technical know-how and your creative eye have to work together to produce photos that make people want to live in that house. The difference between a pro and just some person with a nice camera is the ability to walk into any room, under any lighting condition, and know exactly how to get a great shot.
Every shoot needs a game plan. You have to develop a methodical, repeatable workflow that ensures you nail every critical shot, every single time. That consistency is what agents are paying you for.
Perfecting Your Interior Shots
Shooting interiors is really a game of managing light and space. The mission is simple: make every room look bright, spacious, and welcoming. You're trying to capture the true feel of the property while making its best features pop.
I always recommend starting in Aperture Priority mode. Set your aperture somewhere between f/8 and f/11. This range is the sweet spot for real estate because it gives you a deep depth of field, keeping everything from the chair in the foreground to the art on the back wall perfectly sharp.
Next, lock in your ISO at its lowest native setting, which is usually ISO 100 or 200. This keeps digital "grain" or noise out of your images, giving you the cleanest possible file to work with. Since your camera is locked down on a tripod, you don't have to worry about a slower shutter speed causing blur.
My Go-To Interior Settings: I start every room the same way. Camera in Manual Mode, aperture at f/8, and ISO at 100. I let the camera determine the initial shutter speed for a baseline exposure, and then I start bracketing from there.
This simple foundation takes all the guesswork out of the equation. It frees you up to concentrate on what really makes a difference: your composition and how you shape the light.
The Power of the Flambient Technique
If you want to take your interior photos from good to great, you need to learn the "flambient" method. It sounds complicated, but it's just a technique for blending a natural light (ambient) shot with a flash-lit shot to create one flawless image.
Here’s the basic rundown:
- The Ambient Shot: With your camera firmly on the tripod, take a photo exposed for the view outside the windows. The interior might look a little dark, and that’s okay. The goal here is to capture the scenery without it being blown out.
- The Flash Shot: Now, without moving the camera an inch, take a second photo using an off-camera flash. Don't point it directly at the room—bounce it off the ceiling or a neutral-colored wall. This fills the room with soft, even light and kills any weird color casts from lamps or overhead lights.
- Blend in Post: In an editing program like Adobe Photoshop, you stack these two images. You use the perfectly exposed windows from your ambient shot and combine them with the clean, well-lit interior from your flash shot.
What you get is a crisp, vibrant photo with clean white ceilings, true-to-life colors, and that million-dollar view perfectly preserved. This is a signature look for high-end real estate photography. To really sharpen your craft, keep learning with actionable real estate photography tips that cover everything from staging to advanced lighting.
Capturing Curb Appeal with Exterior Photos
When it comes to exteriors, your best friend is timing. Nothing beats the light during the "golden hour"—that first hour after sunrise and the last hour before sunset. The light is soft, warm, and wraps around the property beautifully, minimizing harsh shadows.
The money shot for any exterior is always the "curb appeal" shot. This is typically a straight-on or three-quarter view of the home that shows it off from its most flattering angle. Pay serious attention to your lines here. Use your camera's grid display to make sure every vertical line—walls, columns, door frames—is perfectly straight. Even a slight tilt can make a house look weird and distorted.
This quick visual shows how the three pillars of your gear—camera, lens, and tripod—come together on a shoot.
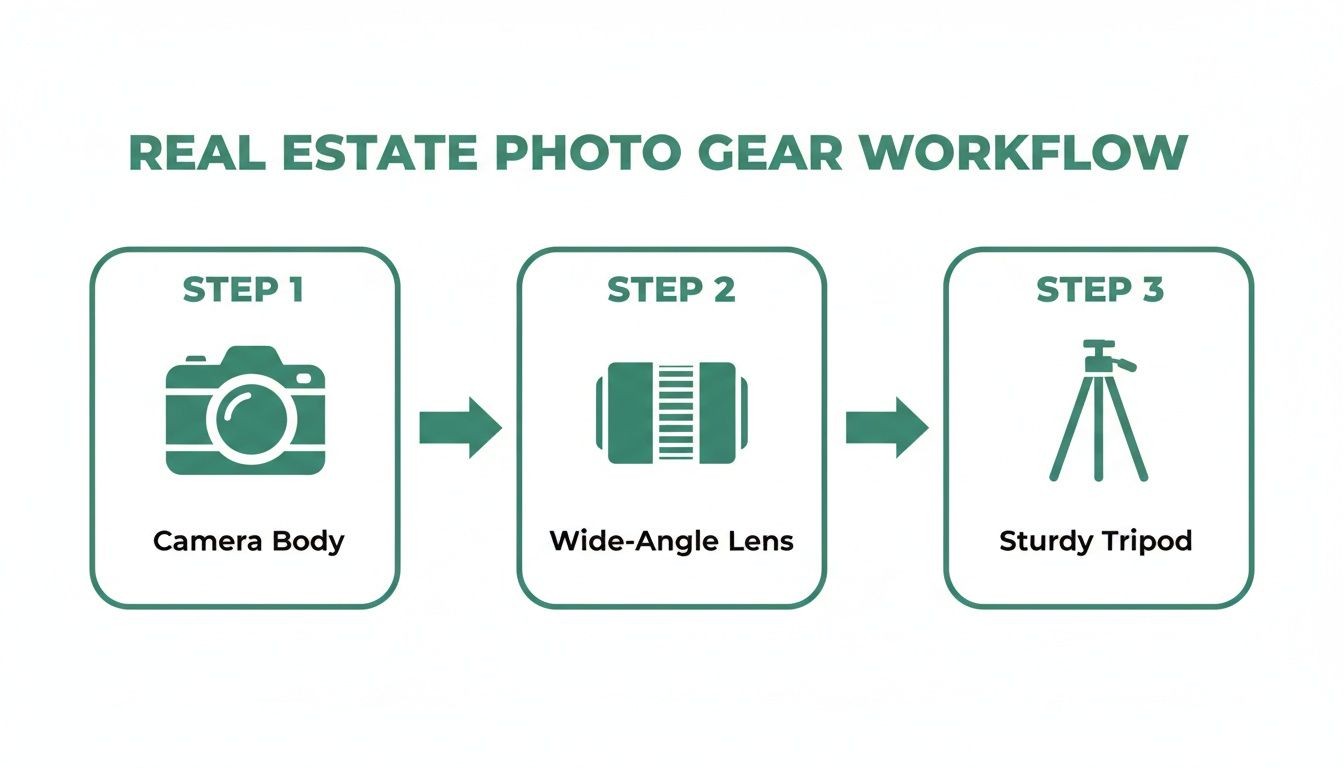
As the infographic shows, a solid camera body, the right wide-angle lens, and a sturdy tripod are the foundation for everything you do.
Adding Value with Twilight and Drone Photography
Want to make more money? Start offering premium services like twilight and drone photography. Twilight shots, captured just after the sun goes down, are pure drama. The glowing interior lights against a deep blue sky create a luxurious feel that agents love, especially for high-end listings.
Drone photography offers a perspective you just can't get from the ground. It’s a game-changer for showing off large properties, highlighting a home's proximity to a park or a lake, and giving buyers a real sense of where the house sits in the neighborhood. The impact is huge; some data suggests that listings with aerial photos can sell up to 68% faster.
By adding these services, you're not just a photographer anymore. You become a high-value marketing partner for your clients—and the go-to person for all their listing needs.
Nailing Your Post-Production Workflow
Getting the shots on-site is only half the battle. The real magic, the stuff that makes agents’ phones ring, happens back at the computer. A repeatable and efficient post-production workflow is what separates the pros from the hobbyists and leads to stunning images that sell homes.
This isn't just about applying a preset and calling it a day. It's a methodical process of sorting, correcting, and polishing your RAW files into a final product that looks bright, sharp, and inviting. The goal is to build a system you can rely on to deliver consistently high-quality photos, every single time.
Laying the Groundwork in Adobe Lightroom
Good editing starts with good organization. The very first thing I do after any shoot is dump all my RAW files into Adobe Lightroom and create a dedicated folder for that property. It’s a simple habit that prevents major headaches down the road.
With everything imported, it’s time to cull. This is where I quickly rip through all the bracketed shots to find the strongest compositions. I use a simple five-star rating for the base exposures I intend to use. This instantly filters out all the extra frames and lets me focus only on the keepers.
Before I even think about blending, I apply a few key adjustments to all my selected images:
- Lens Corrections: The first two boxes I check are "Enable Profile Corrections" and "Remove Chromatic Aberration." This is a non-negotiable step that instantly fixes the distortion and color fringing that are common with wide-angle lenses.
- White Balance: Nailing the color is critical. I grab the white balance dropper tool and click on something neutral gray or white in the scene—a ceiling, a white cabinet, a door frame—to kill any weird color casts from the lighting.
- Verticals, Verticals, Verticals: I can't stress this enough. Using the Transform tool to ensure all my vertical lines are perfectly straight gives photos an immediate professional look. Crooked walls are a dead giveaway of an amateur.
Getting these fundamentals right creates a clean slate, making the more complex editing work that follows much, much easier.
Blending for a Natural, Punchy Look
This is where your photos really start to sing. Whether you prefer automated High Dynamic Range (HDR) software or the more hands-on "flambient" method, the goal is always the same: merge multiple exposures into one perfectly lit image that looks completely natural.
I’m a big fan of blending manually in Photoshop, usually using the flambient technique. It involves opening my ambient shot (which captures the natural light and window views) and my flash shot (which lights the interior perfectly) as separate layers. From there, I use layer masks to literally "paint in" the gorgeous window view onto the beautifully lit room.
This hands-on approach gives you ultimate control, letting you avoid that fake, almost cartoonish look that some one-click HDR programs are notorious for.
The best edit is one you don't even notice. Your job isn't to create a dramatic art piece; it's to produce a clean, accurate, and appealing photo that makes someone want to live in that space.
As your business picks up, this part of the process can become a bottleneck. Exploring professional real estate photo enhancement services is a smart move for many photographers. It can save you a ton of time and ensure every gallery you deliver has that consistent, polished look agents love.
The Final Polish and Export Settings
Once the heavy lifting of blending is done, I bring the image back into Lightroom for a final round of tweaks. These are the small, subtle adjustments that really make a photo pop.
I'll fine-tune the contrast, highlights, and shadows to add a bit more depth. A little touch of clarity or texture can really sharpen up details like countertops and flooring. I might also give the vibrance a slight nudge to make the colors feel rich without looking garish or oversaturated.
When you're ready to export, your settings are crucial. For MLS and general web use, I export JPEGs using the sRGB color profile, resized to 2048 pixels on the long edge, and with output sharpening set to "Screen." This keeps the files looking crisp online while ensuring they load quickly for potential buyers scrolling through listings.
Moving from Hobbyist to Pro: Business Setup and Pricing
Great photos are your product, but a solid business structure is what turns your passion into a real career. This is where you shift from being just a photographer to a business owner. It's about getting the "boring" stuff right so you can focus on the creative work, knowing you're protected and profitable.
Let's be honest, tackling legal and financial details isn't why you picked up a camera. But getting this foundation in place early on is what separates the pros from the hobbyists and shows agents you’re a serious partner they can rely on.
Structuring Your Business the Right Way
Before you even think about sending your first invoice, you need a legal framework. How you set up your business affects your taxes, your personal liability, and how clients perceive you.
For most photographers starting out, it boils down to two main paths:
- Sole Proprietorship: This is the default, no-fuss option. You and your business are one and the same in the eyes of the law. It’s simple to manage, and your business income is just filed with your personal taxes. The downside? There’s no legal separation, meaning if something goes wrong, your personal assets could be at risk.
- Limited Liability Company (LLC): Think of an LLC as a protective wall between your personal life and your business. If your business were to face a lawsuit, your personal assets—like your house or car—are generally safe. It takes a bit more paperwork and a small fee to set up, but that peace of mind is worth its weight in gold as your business grows.
Making this choice from day one is a critical first step toward building a business that lasts.
Don't Skip the Insurance
I get it. When you're just starting, insurance feels like an extra cost you'd rather avoid. But trust me on this one: it's one of the best investments you'll ever make. Imagine your tripod topples and smashes a priceless antique vase, or you accidentally trip and put a hole in the drywall. It happens.
You absolutely need two types of coverage:
- General Liability Insurance: This is your "oops" coverage. It protects you against claims of property damage or bodily injury that happen while you're on a shoot.
- Errors & Omissions (E&O) Insurance: This one covers professional mistakes. Let's say a memory card corrupts and you lose an entire shoot. E&O insurance can help cover the financial fallout from that kind of disaster.
Beyond just protecting you, having proof of insurance is a mark of professionalism. Many high-end agents and commercial clients won't even talk to you without it.
One of the biggest mistakes I see new photographers make is undervaluing themselves and ignoring the risks. Your business structure and insurance aren't just red tape; they're the safety net that lets you work confidently and protects everything you're building.
How to Price Your Services with Confidence
Alright, let's talk about the big one: how much should you charge? Pulling a number out of thin air or just trying to be the cheapest guy in town is a fast track to burnout. Smart pricing is a strategy, not a guess.
First, do your homework. Scope out the other real estate photographers in your city. What are they charging? What's included in their packages? You're not looking to copy them, but you need to understand the local market rate to position yourself effectively.
The good news? The market is in your favor. Recent data shows that nearly two-thirds of photographers have been able to raise their rates. A solid mid-range photographer can expect to charge around $350 for a standard package of 25 photos. What's even more promising is that only 35% of real estate agents are currently hiring pros, which means there's a huge, untapped market waiting for you. This combination of rising prices and high demand is a golden opportunity. You can find a great breakdown of these market trends on YouTube.
Think in Packages, Not Photos
The most successful photographers have learned that they aren't just selling pictures; they're selling marketing solutions. The best way to do this is by creating tiered packages. This approach simplifies the buying process for agents and subtly encourages them to invest more.
A simple three-tier system is incredibly effective:
| Package Tier | Included Services | Ideal For |
|---|---|---|
| Standard | 25 High-Res Photos | Smaller homes, starter listings, or rental properties. |
| Premium | 35 High-Res Photos, Drone/Aerial Photos | Mid-to-large homes where the property and lot need to shine. |
| Luxury | 40+ Photos, Drone, Twilight Shots, Video Walkthrough | High-end listings that require the full cinematic treatment. |
This structure is brilliant for a few reasons. It makes the decision easy for the agent, it clearly shows the value of upgrading, and it anchors your pricing, making your standard package feel like an absolute steal.
By setting up your business properly and being strategic with your pricing, you're not just a photographer for hire. You're building a sustainable brand that can command professional rates and grow for years to come.
Marketing Your Services to Find Your First Clients

You’ve got the gear, you know the techniques, and you've got a business plan. Now for the fun part—actually getting paid. Landing those first clients is less about having raw talent and more about a smart, targeted marketing approach that proves your value to busy real estate agents.
This isn't a "spray and pray" game. It's about taking deliberate action. From building a portfolio that stops agents in their tracks to making genuine connections with local players, this is how you turn your skills into a steady stream of bookings.
Build a Portfolio That Sells
Before you dream of sending a single email, you need a killer portfolio. It’s your number one sales tool, and it has to scream professionalism, quality, and a real understanding of what agents need.
Don't have any paying clients yet? No sweat. You have to create the opportunities yourself to build a solid starter portfolio.
- Shoot your own home: Seriously. Treat it like a high-end listing. Stage every room, use all the techniques we've covered, and edit the photos until they shine.
- Offer a free shoot to a friend: Know someone with a nice, well-kept home? Ask if you can photograph it. This adds variety and shows you can handle different styles of properties.
Your goal is to pull together 10-15 of your absolute best shots. You want a mix of bright kitchens, cozy living rooms, sharp exteriors, and maybe a few detailed close-ups. Get these photos onto a clean, simple website or a dedicated portfolio page. This is the link you'll be sending to every single potential client.
Identify Your Ideal Clients
Your first thought might be to blast an email to every agent in a 50-mile radius. Don't do it. A much smarter play is to zero in on the agents who are most likely to appreciate and invest in great photography.
Start by Googling "top real estate agents" or "top real estate teams" in your town. Look at their current listings. Are they already using professional photos? Perfect. These are the people who already get it. You aren’t selling them on a concept; you're just showing them you're a better choice.
Create a hit list of 20-30 target agents. Dig into their recent sales, their branding, and the kinds of homes they usually sell. This little bit of homework will pay off big time when you start reaching out.
The goal isn't just to get one job; it's to build a long-term partnership. A single top-producing agent can feed you consistent work for years, becoming the rock-solid foundation of your business.
Master Your Local Outreach
Okay, portfolio is ready and your target list is made. It's go time. The key here is to be professional, personal, and brief. Agents are constantly swamped, so your message needs to respect their time while showing them what you can do.
Craft a Compelling Introduction Email
Think of your first email as a digital handshake. It has to be good.
- A Specific Subject Line: Ditch generic stuff like "Photography Services." Try something like, "Photography for your listings in [City Name]" or "A quick question about your [Agent's Brokerage] listings."
- Personalize the Opening: Show you’ve done your research. Mention a specific listing of theirs you liked. "Hi [Agent Name], I was really impressed with the marketing for your recent sale on Elm Street."
- State Your Value Prop: Get to the point in one or two sentences. "I'm a real estate photographer here in [Your City], and I specialize in creating bright, natural images that help listings get noticed."
- Provide Proof: This is where you drop the portfolio link. "You can see a few examples of my recent work right here."
- A Clear, Low-Friction Call to Action: Don't ask for a 30-minute meeting. Make it easy for them to say yes. "Would you be open to a quick 10-minute call next week to see if I might be a good fit for your team?"
After you hit send, find that agent on Instagram or LinkedIn and give them a follow. Leave a thoughtful comment on one of their posts. It’s a simple, non-pushy way to stay on their radar. For more ideas, this guide on how to get clients for your photography business has some great strategies.
Leverage Social Media as Your Digital Showroom
Use Instagram as a living, breathing extension of your portfolio. Post your best work consistently and use hashtags that local agents are searching for, like #[YourCity]RealEstate or #[YourNeighborhood]Realtor. This helps them find you organically.
Mix it up with behind-the-scenes shots, quick before-and-after editing videos, and client testimonials once you start getting them. This builds your credibility and establishes you as the go-to expert in your market. Down the road, you could even look into paid partnerships. You can learn more about how to get brand deals as a creator to see how that works.
By combining a fantastic portfolio with smart, authentic outreach, you'll be well on your way to booking those first clients and building a real career in real estate photography.
Answering the Big Questions for New Photographers
When you're just starting out in real estate photography, you're going to have a ton of questions. That’s a good thing. Getting solid answers early on helps you avoid common pitfalls and build your business on a strong foundation.
Let's dive into a few of the questions I hear most often from photographers who are new to the game.
Do I Really Need a Full-Frame Camera to Start?
Short answer: Nope. While full-frame cameras are fantastic, especially for their low-light performance, they are absolutely not a requirement to get started and produce professional work.
Honestly, a modern crop-sensor (APS-C) camera is more than capable of delivering the crisp, high-quality images agents need to market a home. If you're working with a limited budget, your money is far better invested in a quality wide-angle lens and a rock-solid tripod. Those two pieces of gear will have a much bigger impact on your final images than the camera body will.
You can easily build a successful business with a crop-sensor body and upgrade down the line when the jobs start rolling in.
How Many Photos Should I Give an Agent for a Typical Listing?
For a standard home under 3,000 sq ft, the sweet spot is usually between 25-35 final, edited images. This range is enough to give potential buyers a comprehensive virtual tour without completely overwhelming them.
A solid gallery should always include:
- A few great shots of the front and back exteriors.
- The "money shots": kitchen, living room, and master bedroom/bathroom.
- Photos of all other bedrooms and bathrooms.
- Any special features that make the property stand out, like a finished basement, a home office, or a killer view.
Remember, the goal is to tell the home's story through your photos. It's always better to deliver a curated set of 25 incredible shots than 50 average ones. In this business, quality beats quantity every single time.
What’s the Fastest Way to Land My First Client?
Getting that first paid job often feels like the biggest hurdle, but there's a straightforward path: build a small portfolio and then reach out directly to the right people.
You don't need paying clients to build a portfolio. Start with your own house, or ask a friend or family member if you can shoot their place. Treat it like a real gig, edit the photos to a professional standard, and pick your best 10-15 images. That's your starter portfolio.
Next, do a little research and find real estate agents who have just recently gotten their license. New agents are building their business from scratch, just like you, and are often more open to trying a new photographer. Send a short, professional email introducing yourself, share a link to your work, and maybe even offer an introductory price for their first listing. This is one of the most effective ways to get your foot in the door and start building relationships.
Ready to connect with agents actively looking for photographers? Join PropPhoto to create your free professional profile, showcase your portfolio, and get discovered by local clients. It's the simplest way to start getting booked. Find your next job on https://propphoto.com today.

