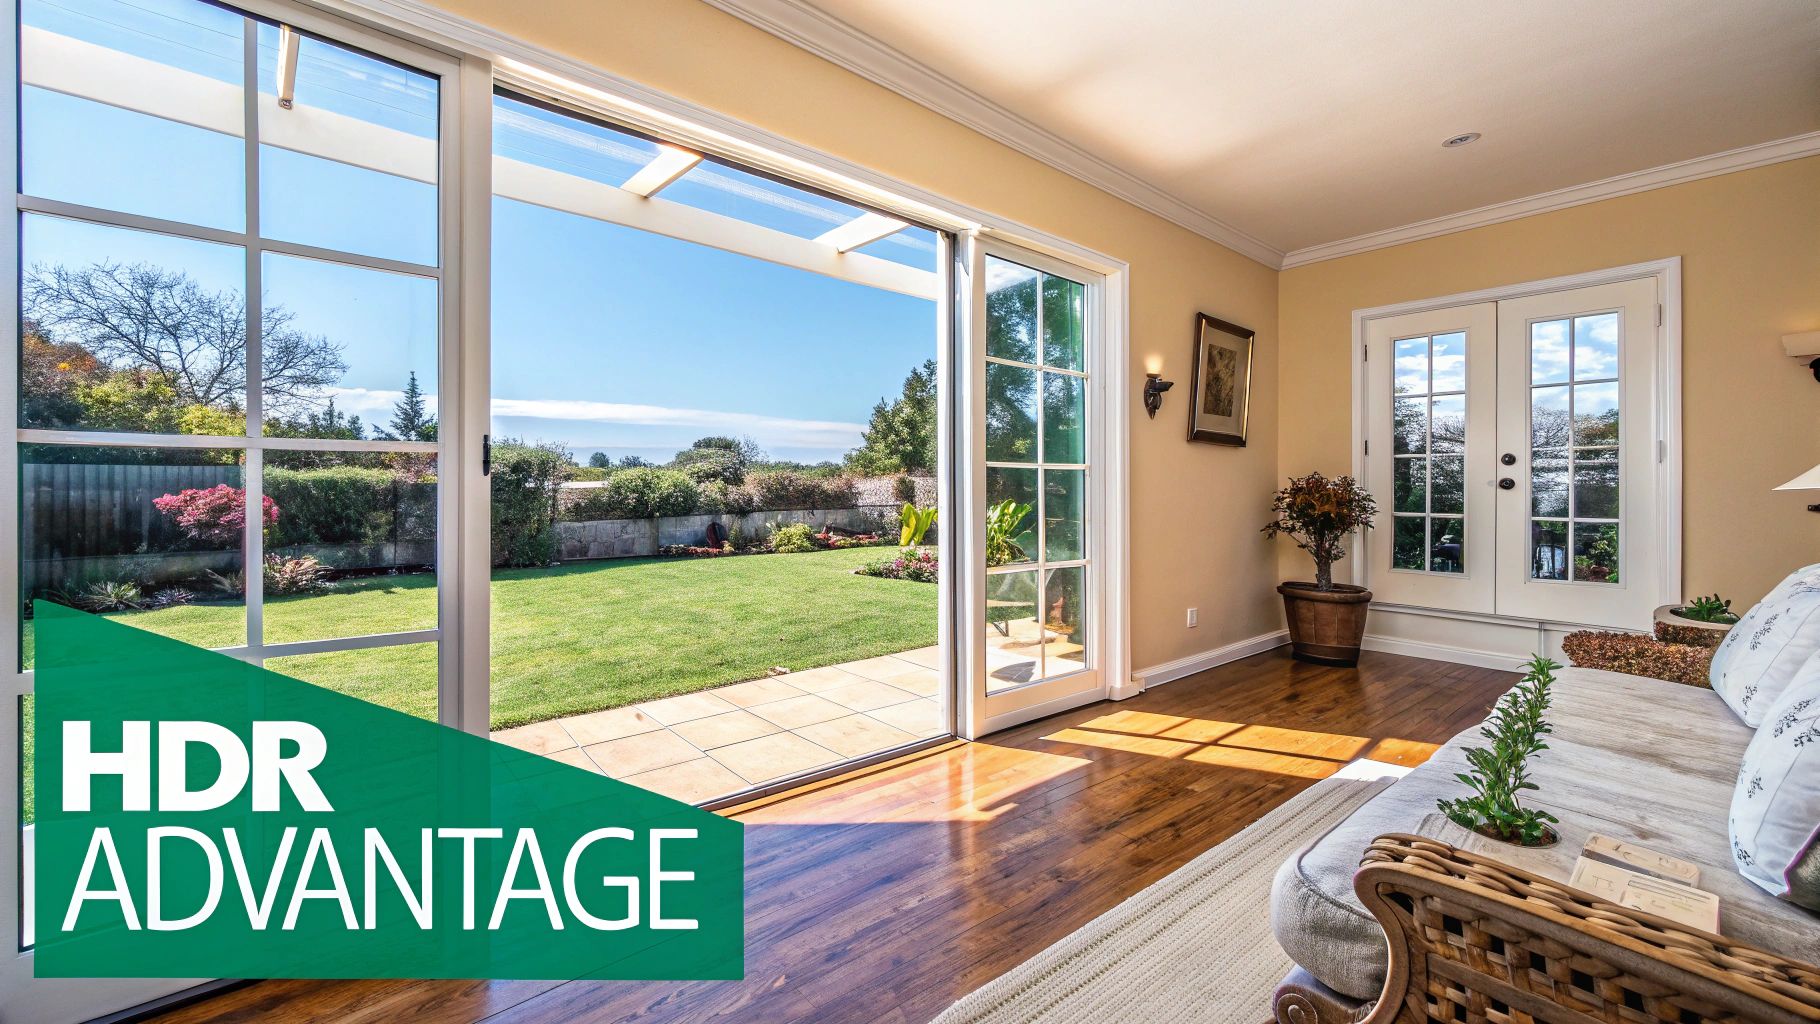
If you've ever tried to photograph a room with a big, bright window, you know the struggle. Your camera forces you to choose: expose for the room and the window becomes a blasted-out white rectangle, or expose for the gorgeous view outside and the room turns into a dark, shadowy cave. Neither shot is going to sell a house.
This is exactly where High Dynamic Range (HDR) photography comes in. It’s a technique that blends multiple photos taken at different brightness levels into one perfectly balanced image, solving the biggest lighting challenge in our industry.
Why HDR Photography Is a Must for Real Estate
Learning HDR isn't just about adding another tool to your kit; it's fundamental to surviving and thriving as a real estate photographer. It's the professional solution for capturing a scene the way the human eye actually sees it—with detail in both the darkest shadows and the brightest highlights.
Instead of a single, compromised shot, you're merging a series of exposures. You’ll take one shot for the dark interior details, another for the mid-tones, and a third for the bright view outside the window. Your software then stitches them together into a final image that's detailed, vibrant, and true to life.
The Real-World Impact of Balanced Lighting
This approach is crucial for a few simple reasons. By blending exposures, you can finally show a potential buyer everything at once.
- It Showcases the Full Package: The buyer sees the inviting living room and the beautiful backyard simultaneously.
- It Creates a High-End Feel: Images look bright, airy, and professional, which instantly boosts the property's perceived value.
- It Stops the Scroll: On crowded listing sites and social media feeds, stunningly lit photos grab attention and get clicks.
In a competitive market, that visual edge makes a huge difference. In fact, professional HDR imaging has been shown to help listings sell 50% faster and pull in 118% more online views than listings with standard, amateur photos. You can dig into more data on how professional photos impact sales.
A great HDR photo doesn't scream "I'm an HDR photo." The goal is natural realism. It should make a viewer feel like they’re standing in the room, not looking at an overcooked, surreal image.
Ultimately, HDR is about presenting a home in its best, most accurate light. You're helping buyers see the full potential of a space, making them far more likely to pick up the phone and book a showing. For us photographers, delivering those consistently fantastic results is how we build a strong reputation and keep our schedules full.
Nailing the Shot: Your Gear and Camera Settings for Perfect Brackets
You don't need the most expensive camera on the market to produce stunning HDR images, but you absolutely need the right foundational gear. When it comes to real estate HDR, consistency is everything. A few non-negotiable pieces of equipment will save you from headaches in post-production and ensure your bracketed shots are clean and perfectly aligned.
Your best friend on any shoot is a sturdy tripod. Seriously, don't skimp here. It's the one thing that prevents misalignment between your exposures, which can be an absolute nightmare to fix later. Even a tiny camera movement will introduce blur and ghosting. You don't need a ten-pound beast, but stay away from those flimsy, cheap tripods that wobble if you breathe on them.
Next up is a wide-angle lens. For interior shots, a focal length between 16mm and 24mm on a full-frame camera is the industry standard. This range is the sweet spot for making rooms feel open and spacious without creating that weird, distorted funhouse-mirror effect.
One last small but mighty tool: a remote shutter release or your camera's built-in two-second timer. Physically pressing the shutter button introduces just enough vibration to throw off the alignment of your brackets. Taking your hands off the camera for the actual exposure is a simple habit that makes a huge difference.
Dialing in Your Camera for Consistent Brackets
With your gear sorted, it's time to set up your camera. The goal is simple: lock down every variable except for shutter speed. Your camera will only adjust the shutter to create the different exposures needed for the HDR blend.
The first rule of bracketing is to always shoot in Manual Mode (M). This is non-negotiable. It gives you direct control over aperture and ISO, locking them in place for the entire set of photos. If you use an automatic mode, the camera might decide to change the aperture mid-bracket, which ruins your depth of field and creates a blurry mess. Always shoot in RAW, too—it captures way more data, giving you much more latitude when you start editing.
Pro Tip: Learn to love your histogram. It's the most reliable way to judge your base exposure. For your "middle" shot (0 EV), you want the histogram data to be mostly centered, not slammed up against the left (crushed blacks) or right (blown highlights) edges. This gives your brackets the best chance of capturing the scene's full dynamic range.
Recommended HDR Camera Settings for Real Estate
Here's a quick reference table for the settings I use on almost every single interior shoot. It's a fantastic starting point for getting sharp, clean, and consistent results.
| Setting | Recommended Value | Reason |
|---|---|---|
| Shooting Mode | Manual (M) | Locks aperture and ISO for consistency across all brackets. |
| File Format | RAW | Captures maximum image data for editing flexibility. |
| ISO | 100-200 | Minimizes digital noise for the cleanest possible final image. |
| Aperture (f-stop) | f/8 - f/11 | Creates a deep depth of field, keeping everything in sharp focus. |
| White Balance | Custom or Preset (e.g., Daylight) | Prevents color shifts between exposures; avoid Auto WB. |
| Focus Mode | Manual Focus (MF) or Single Shot AF | Locks focus to prevent the camera from refocusing between shots. |
| Image Stabilization | OFF | When on a tripod, IS can actually introduce slight movements. |
Once you've dialed in these core settings, you're ready to set up your Auto Exposure Bracketing (AEB).
Core Settings for Sharp, Noise-Free HDR Photos
Let's break down those key settings a bit more.
ISO: Always keep it as low as your camera will go, usually ISO 100 or 200. Since you're on a tripod, shutter speed doesn't matter, so there’s no reason to introduce the grain and noise that comes with higher ISOs.
Aperture: I live in the f/8 to f/11 range for interiors. This gives you a deep depth of field, meaning the chair in the foreground and the trees outside the window will both be perfectly sharp.
White Balance: Never use Auto White Balance for bracketing. The camera can get confused and change the color temperature from one shot to the next, which is a pain to correct. Use a grey card to set a custom white balance, or at least pick a fixed preset like "Daylight."
With everything locked in, it's time to set your bracketing sequence. Most modern cameras can fire off 3, 5, or even 7 shots automatically. For a typical room with a bright window view, a 5-shot bracket with 2-stop intervals (e.g., -4, -2, 0, +2, +4) is a bulletproof strategy. This gives you a massive range of light to work with, from the darkest corner shadows to the brightest window highlights.
If you're in the market for a new camera, be sure to check out our guide on the best cameras for real estate photography that have these essential bracketing features.
Executing the Perfect On-Site Shooting Workflow
The moment you step onto a property, your on-site workflow kicks into gear. This is where all the prep work and gear knowledge pay off, translating into the high-quality bracketed images that are the bedrock of any stunning real estate listing. Getting this right isn't just about pointing and shooting; it’s about having a repeatable, efficient process that saves you time and guarantees great results every single time.
Your first ten minutes are critical. Before you even think about popping open your tripod, do a quick walkthrough of the entire property. This initial scout is your chance to identify the money shots—the living room with that killer view, the spacious master bedroom, the updated kitchen—and get ahead of any lighting problems. You might spot a kitchen with warm tungsten lights fighting against the cool daylight from a window, a classic mixed-lighting puzzle you'll need to solve.
This quick tour lets you mentally map out the entire shoot, so you can decide on the most powerful compositions before you ever press the shutter. It's all about working smarter, not harder.
Mastering Composition for Impact
How you frame a room can completely change a buyer's perception of the space. Ditch the habit of just planting your tripod in the center of every room and start thinking like someone who might actually buy the house. What angles truly showcase the home's flow and size?
Here are a few composition techniques that I rely on:
- Shoot from Doorways: Setting up your camera in a doorway and looking into a room creates a natural, inviting feel. It's as if you're welcoming the viewer to step right in.
- Use Two-Wall Corner Shots: Placing your tripod in a corner to capture two walls almost always makes a room feel larger and more dimensional than a flat, one-wall shot.
- Emphasize Key Features: Does the room have a gorgeous fireplace or a huge picture window? Make that the undeniable focal point of your shot.
These small adjustments can take a generic room photo and turn it into a compelling image that tells a story about what makes the home special.
The technical setup for each HDR shot should become muscle memory, freeing you up to focus on the creative side. This simple flow chart breaks down the core steps.
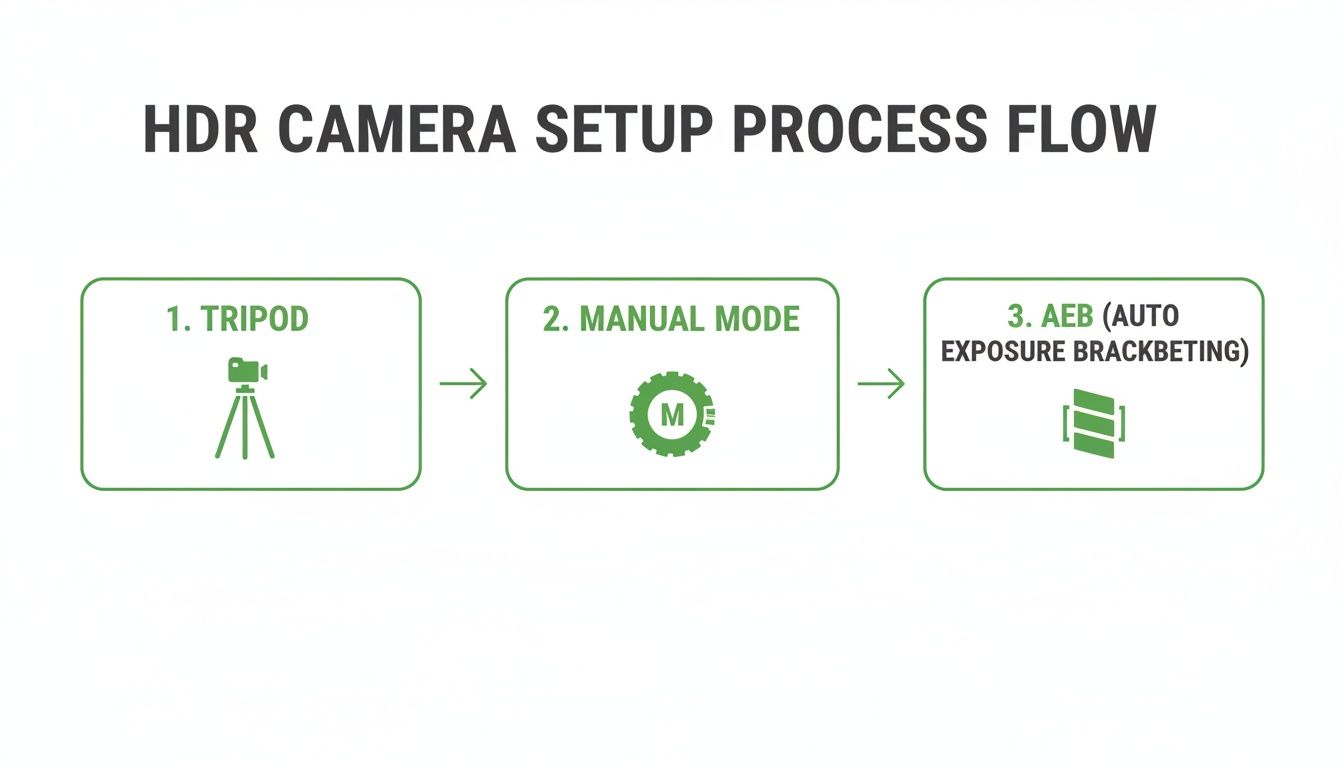
This workflow ensures every variable is locked down except for your shutter speed—which is exactly what you need for clean, perfectly aligned brackets.
Choosing the Right Bracketing Strategy
Not every room needs the same bracketing treatment. Your approach has to adapt to the dynamic range of each scene. Over-shooting brackets wastes time and fills up your memory cards, but under-shooting means you won't have the data you need for a clean blend back at the office.
For a high-contrast living room with huge windows and deep, dark shadows, a 5-shot bracket at ±2 EV is your go-to. This wide range (think -4, -2, 0, +2, +4) makes sure you capture everything from the bright clouds outside to the texture in the dark wood floors.
But for a softly lit hallway or a powder room with no windows, a simple 3-shot bracket at ±2 EV (-2, 0, +2) is usually plenty. Knowing how to quickly size up a room's lighting and pick the right number of exposures is a skill that separates the pros. For a deeper look at dealing with tricky lighting, our guide on mastering interior lighting covers more advanced techniques.
The goal is to capture the full range of light in the fewest number of shots necessary. That efficiency adds up over a full day of shooting and helps you deliver projects faster without ever compromising on quality.
Handling On-Site Headaches Like Ghosting
Let's be real—shoots in the wild are never perfect. You're going to run into challenges, and one of the most common is movement between your bracketed shots, which creates an ugly effect called ghosting. The number one culprit? A spinning ceiling fan. But it can also be caused by leaves rustling outside a window or even someone walking through the background.
The best fix is always prevention. Before you start your brackets, politely ask the agent or homeowner to turn off all the ceiling fans. It’s a simple request that can save you a world of hurt in post-production.
If movement is unavoidable—like wind blowing trees around outside—most modern HDR software has a "de-ghosting" tool. But relying on software should always be your plan B. Taking a moment to control the environment on-site is what professionals do. It’s a critical part of an effective HDR workflow that ensures your source files are as clean as possible, which always leads to a better final image.
Your Post-Processing Workflow for Natural HDR Photos
Getting the perfect set of brackets on-site is a great feeling, but the work that actually sells the property happens back on your computer. Your post-processing workflow is where you’ll transform those individual RAW files into a single, stunning image that looks bright, natural, and inviting. This isn't about creating over-the-top, surreal effects; it's about crafting a clean and believable final product that buyers can connect with.
The heart of the process is blending your exposures. While there are a few ways to go about this, the industry standard for hdr photography real estate is a technique called Exposure Fusion. This is a huge leap forward from older tone-mapping methods that often left photos looking grungy or unrealistic. Exposure fusion intelligently cherry-picks the best-lit pixels from each bracket and merges them into a final image with a massive dynamic range.
This is exactly what Adobe Lightroom Classic does with its 'Merge to HDR' function. It’s built to prioritize a natural, photographic look—which is precisely what agents and home buyers want. The goal is simple: make the room look just like it would on a perfect day, with a beautifully balanced interior and a crystal-clear view out the window.
Importing and Merging Brackets in Lightroom
Your workflow really kicks off the moment you pop in your memory card. A little organization here saves a ton of time down the line. I always import all the photos from a single property into their own dedicated folder. It keeps things tidy and easy to manage.
Once everything's imported, the first real task is to group and merge your bracketed sets.
- Jump into the Library module and select the sequence of bracketed photos for one composition (your 3, 5, or 7 RAW files).
- Right-click the selected shots and navigate to Photo Merge > HDR. The keyboard shortcut Ctrl+H (or Cmd+H on Mac) is a real time-saver here.
- This brings up the HDR Merge Preview window, where you have a few critical choices to make.
Getting these initial settings right is what sets you up for a clean, professional result.
My Non-Negotiable Tip: Always, always check the "Auto Align" box. Even with the sturdiest tripod, tiny vibrations can happen. This feature perfectly lines up every pixel from each exposure, killing any chance of blur or ghosting in the final merged image. Just consider it a mandatory step.
Understanding the HDR Merge Settings
Inside that merge window, you’ll find a few simple but powerful options. For most real estate work, the default settings are surprisingly good, but you need to know what they do.
- Auto Tone: I recommend leaving this checked for now. Lightroom applies a basic set of adjustments to give you a balanced starting point. You’re going to fine-tune everything yourself in a minute, but this provides a solid foundation to build on.
- Deghost Amount: This is your secret weapon against movement between frames—think leaves rustling outside a window or a ceiling fan you forgot to shut off. I usually set it to Low or Medium. If you scan the preview and don't see any weird artifacts, you can even leave it off.
- Create Stack: Checking this box is just good housekeeping. It tidies up your library by grouping the original bracketed shots "behind" the new HDR file you’re creating.
Once you hit "Merge," Lightroom does its thing and spits out a brand new, 32-bit DNG file. This file is a powerhouse, containing all the lighting data from your original brackets, which gives you incredible flexibility once you get to the Develop module.
The Art of the Natural Edit
With your merged DNG ready to go, it’s time to switch over to the Develop module and bring the photo to life. Remember, the goal here is subtlety and realism. You’re not creating a dramatic art piece; you’re selling a home.
First things first: Lens Corrections. Head to the Lens Corrections panel and check both "Remove Chromatic Aberration" and "Enable Profile Corrections." This instantly fixes distortion and color fringing specific to your lens. For architectural photography, having perfectly straight lines is non-negotiable.
Next, let's nail the core exposure and tone. The main challenge is balancing the bright window view with the room's interior.
- Highlights: This is your most powerful slider. Drag the Highlights all the way down, often to -100. Watch as all the detail in the window view—the clouds, the trees, the neighboring homes—magically reappears.
- Shadows: Now, gently lift the Shadows to brighten the darker corners of the room and reveal detail. Be careful not to overdo it, or the image can look flat and unnatural. A value between +40 and +70 is usually the sweet spot.
- Whites & Blacks: Use these sliders to set your true white and black points, which adds contrast and pop. A great trick is to hold the Alt/Option key while dragging the sliders. This shows you a clipping mask, so you can push the whites and blacks right to the edge without losing detail.
These fundamental adjustments do most of the heavy lifting. From here, it's all about refining the image with small tweaks to color and clarity. White balance is especially critical for making interiors feel clean and inviting. If you shot a grey card, use the White Balance Selector (the eyedropper tool) to click on it. If not, find something neutral white or grey in the scene, like a light switch plate, to set your color temperature. For more ideas on helpful tools, check out our guide on the top real estate photo editing software.
Ultimately, your post-processing workflow for hdr photography real estate needs to be efficient and repeatable. By harnessing the power of Lightroom's exposure fusion and focusing on clean, natural edits, you can consistently produce bright, aspirational images that will wow your clients and help sell properties faster.
Final Quality Checks and Professional Client Delivery

This is where the pros separate themselves from the amateurs. After all the shooting and editing, that final 10% of the process—the meticulous quality control—is what ensures you’re delivering a flawless, professional product every single time. Rushing this last step can undo all the hard work you’ve already put in.
Think of it as your pre-flight checklist. Before any photo leaves your computer, it needs one last, critical look. This is your chance to catch the little things that clients might not notice consciously but will feel subconsciously, like slightly crooked lines or weird color shifts between rooms.
Getting this right is what builds a reputation for reliability and an almost obsessive attention to detail.
Your Final Image Quality Checklist
Before you even think about hitting that export button, walk away from the screen for a few minutes. Grab a coffee, stretch your legs, and then come back with fresh eyes. This simple habit is incredibly effective for spotting issues you might have gone blind to during a long editing session.
Then, pull up each image and run it through this mental checklist:
- Perfectly Straight Verticals: Are the walls, door frames, and windows dead-on vertical? Even a slight lean can make a photo feel sloppy. Use the transform or geometry tools in your software to nail this down. It’s a non-negotiable hallmark of professional work.
- Consistent Color and Brightness: Click through the entire gallery. Does the living room feel warm and yellow while the kitchen next to it feels cool and blue? Your color temperature and exposure should feel consistent from one shot to the next, creating a smooth, cohesive virtual tour.
- Crisp Window Views: Take a close look at your window pulls. The view outside should be clear and vibrant, but never so bright that it steals the show. It’s there to complement the room, not overpower it.
- No Distracting Blemishes: Now it's time to pixel-peep. Scan the image for sensor dust spots, scuff marks on the walls, or a subtle reflection of your tripod in a shiny appliance. Get rid of them.
This checklist doesn’t take long, but the impact it has on your final product is huge.
A professional delivery is more than just sending files; it's the final, polished representation of your brand. A smooth, impressive handoff process reinforces the value you provide and encourages repeat business and referrals.
Exporting for MLS and Client Needs
Once your images are perfect, it’s time to export. The goal here is to give the client exactly what they need for the local Multiple Listing Service (MLS) and any other marketing they have planned. While every MLS has its own rules, a few standard specs will cover you most of the time.
I always deliver two sets of files: one optimized for the web and one high-resolution set for everything else.
- MLS-Ready Files: Export these as JPEGs using the sRGB color profile. A safe bet for dimensions is 2048 pixels on the longest edge. You’ll want to keep the file size under 1-2 MB to make sure the images load quickly on listing websites.
- High-Resolution Files: For these, use a higher quality setting (90-100) and export them at a larger size, like 4000 pixels on the longest edge. These are what your client will use for print brochures and other high-end marketing.
Elevating the Client Delivery Experience
How you deliver the photos is just as important as the photos themselves. Attaching a zip file to an email gets the job done, but it does absolutely nothing for your brand. To really stand out in the hdr photography real estate market, you need a more polished approach.
Using a professional online gallery system is the way to go. Platforms like PropPhoto offer beautiful, branded galleries where clients can easily view, favorite, and download their images in whatever size they need. It looks a thousand times more professional, saves you a ton of administrative hassle, and turns a simple transaction into a memorable service experience. That’s how you get clients coming back for more.
Your Go-To HDR Troubleshooting Guide
Even when you've got your workflow down pat, questions are bound to pop up. You might be on-site wondering if you've got enough shots, or back at your desk trying to fix an unexpected issue. I've been there. This is a roundup of the most common questions I hear, with the straightforward answers I've learned from years in the field.
Think of this as your quick-reference guide for making the right call when it matters most.
How Many Brackets Should I Be Taking?
This is probably the number one question people ask. For about 90% of interior shots with a window, a 5-shot bracket at 2-stop intervals is the sweet spot. A typical sequence like -4, -2, 0, +2, +4 gives you everything you need to capture the bright view outside and the deepest shadows inside, all in one clean blend.
Of course, not every room needs that much firepower. For a space with less extreme contrast—think a small powder room with no window or a dimly lit hallway—a simple 3-shot bracket (like -2, 0, +2) is usually plenty.
Here's my rule of thumb: If you're ever unsure, take the extra shots. It's always better to have an exposure you don't end up needing than to get back to the office and realize your highlights are blown or your shadows are crushed.
Can't I Just Use My Camera's Built-In HDR Mode?
I get the appeal—it’s fast and easy. But for professional work, using your camera's automatic HDR mode is a non-starter. The camera does all the work for you, spitting out a single, compressed JPEG. This completely ties your hands in post-production, leaving you with a "baked-in" look that you have almost no ability to refine.
By shooting your brackets manually in RAW, you're capturing the maximum amount of information from the scene. This raw data is what gives you the total control needed to merge and edit your photos into the polished, natural-looking images that agents—and their clients—expect.
What Is Ghosting and How Do I Deal With It?
Ever merged your brackets and seen a weird, blurry "ghost" of an object? That’s ghosting. It happens when something moves between your exposures, and it's a classic real estate photography problem. Common culprits are ceiling fans left on, a pet wandering through the shot, or even just leaves blowing in the wind outside a window.
The best fix is to prevent it from happening in the first place.
- Kill the fans. Make turning off all ceiling fans part of your room prep checklist.
- Wait it out. Be patient and wait for people or pets to move completely out of your frame.
- Check the weather. If it’s incredibly windy, tree branches outside a main window can be a nightmare. Shoot those rooms when the wind calms down if possible.
If you can't avoid it, modern software has your back. The de-ghosting tools in programs like Lightroom Classic are surprisingly effective. When you go to merge your photos, you'll see an option for de-ghosting. Try the "low" or "medium" setting first; the software will analyze the moving area and use a single, sharp frame for that spot, eliminating the blur.
Do I Need Photoshop, or Is Lightroom Enough?
For the vast majority of real estate HDR work, Adobe Lightroom Classic is more than enough. Its "Merge to HDR" feature is incredibly powerful and produces the clean, realistic results that define modern real estate photography. You can build an entire career without ever leaving it.
So, when do you need to bring in the big guns with Photoshop? You'll want it for the tricky stuff. Think complex window pulls where you need to manually mask and paint in the view, or heavy-duty object removal like getting rid of a car in the driveway. My advice? Master your workflow in Lightroom first. You'll know it's time to add Photoshop to your skillset when you start hitting creative walls that Lightroom just can't break through.
Ready to connect with real estate agents who value high-quality HDR photography? Join PropPhoto to showcase your portfolio, get discovered by local clients, and manage your bookings all in one place. Sign up for free and keep 100% of your earnings.

