In the competitive worlds of real estate and interior design, a picture isn't just worth a thousand words; it's worth a booking, a sale, or a client commission. Exceptional interior photography does more than document a space. It tells a story, evokes an emotion, and showcases the full potential of a design. But moving from simple snapshots to compelling architectural narratives requires a specific skill set that merges artistic vision with technical precision. It demands a mastery of light, an eye for composition, and a deep understanding of gear and software.
This guide provides a comprehensive roundup of actionable interior design photography tips designed for immediate application. Whether you are a photographer looking to specialize, a real estate agent wanting to elevate your listings, or a designer aiming to build a stunning portfolio, these strategies will help you capture interiors that don't just show a room, they sell a vision. Each tip is structured to provide practical implementation details, moving beyond generic advice to deliver professional-level insights.
We will cover everything from advanced lighting and lens selection to post-processing workflows and client collaboration. You will learn how to master high-contrast scenes with exposure blending, frame compelling compositions, and stage spaces for maximum visual appeal. For photographers building their business, platforms like PropPhoto connect skilled creators with clients who value this level of quality, making mastery of these techniques more valuable than ever. By the end of this article, you will have a clear roadmap to producing consistently breathtaking interior images that command attention and drive results.
1. Master Lighting Techniques for Interior Spaces
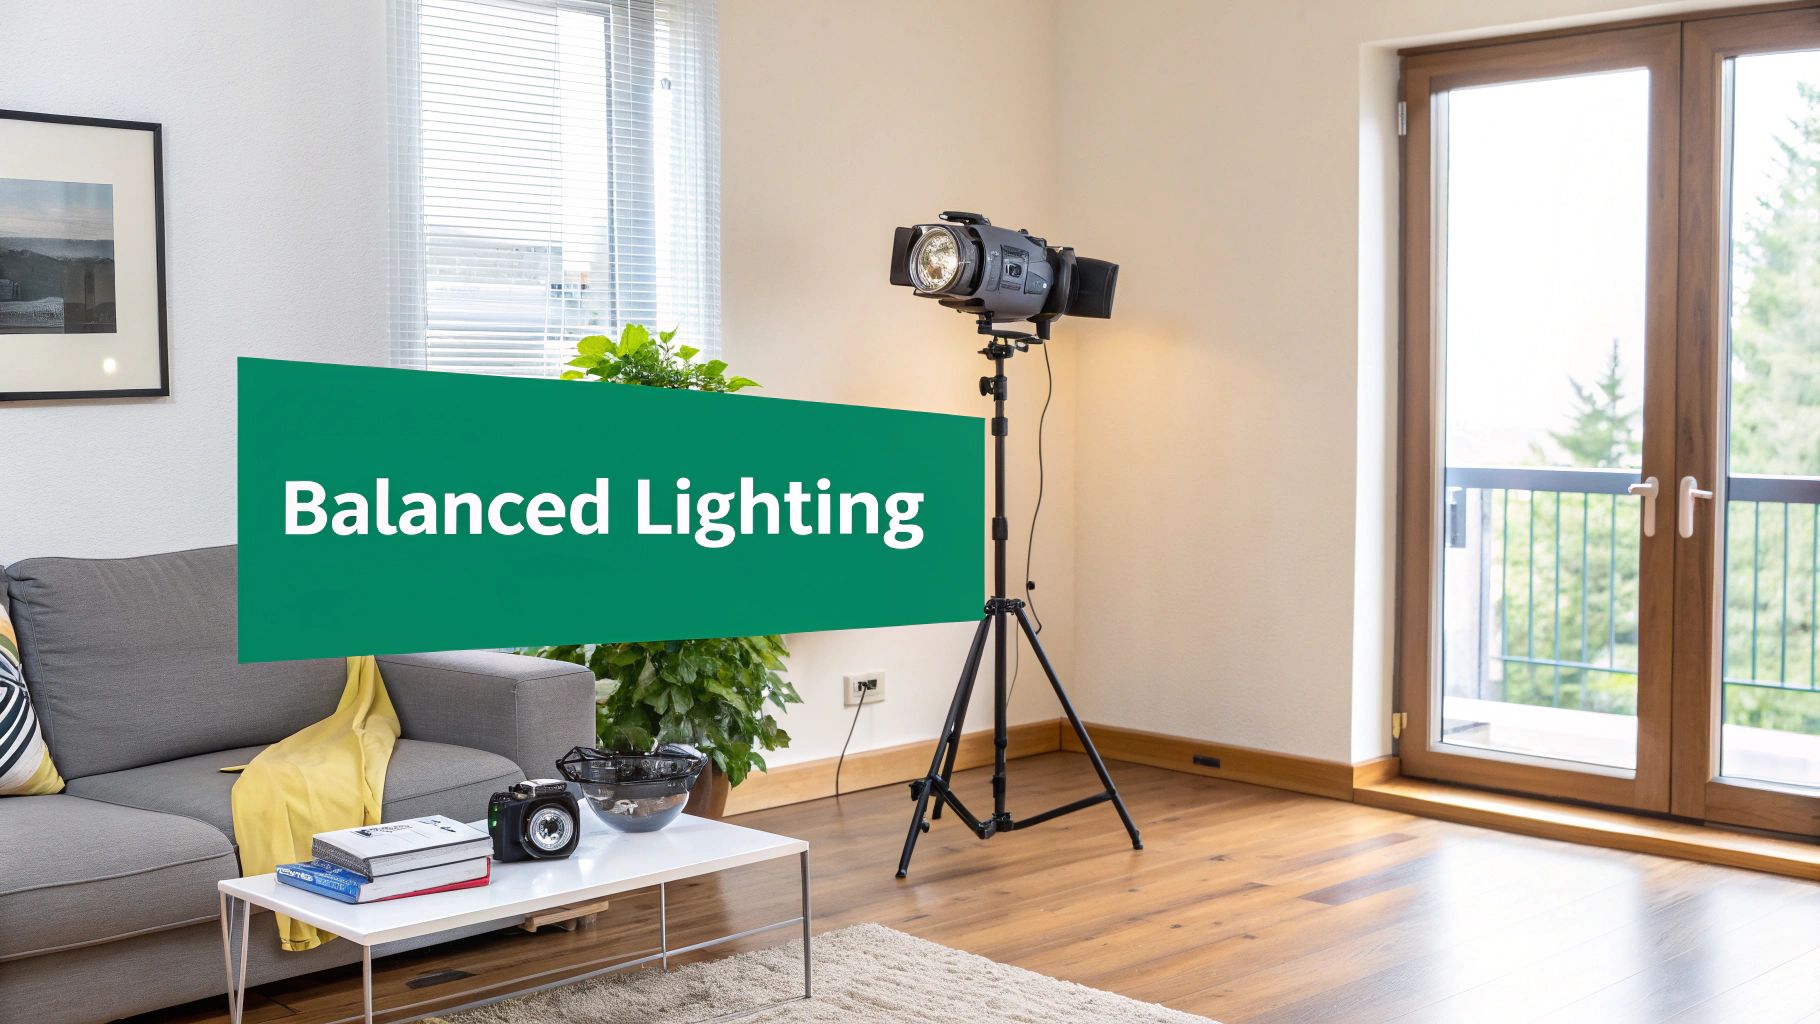
Lighting is the cornerstone of compelling interior design photography. It dictates the mood, reveals texture, defines space, and highlights key architectural features. Mastering lighting involves skillfully blending natural light from windows, existing ambient light from fixtures, and supplemental light from strobes or continuous sources to create an image that feels both authentic and aspiratoral. This technique is crucial for producing professional, high-quality images that stand out on real estate listings, in design portfolios, and across marketing materials.
Why Lighting is Non-Negotiable
Effective lighting separates amateur snapshots from professional architectural photography. A well-lit space appears more spacious, inviting, and valuable. For instance, luxury properties are often shot with layered, warm lighting to emphasize rich materials and craftsmanship. Conversely, minimalist modern homes benefit from clean, directional light that accentuates their sharp lines and uncluttered aesthetic. The goal is to guide the viewer's eye and tell a story about the space, making it feel lived-in yet pristine.
Actionable Lighting Tips
To elevate your interior photography, integrate these professional lighting strategies into your workflow:
- Scout the Location: Visit the property before the shoot day, ideally at different times. Note how natural light moves through the space and identify the optimal time to capture each room.
- Balance Your Exposures: Use a light meter to measure both the ambient light and your flash output. This ensures a natural-looking blend where supplemental lighting enhances, rather than overpowers, the scene.
- Use Off-Camera Flash: Position your key lights at a 45-degree angle to the subject. This creates soft, dimensional shadows that add depth and prevent the flat, harsh look of on-camera flash.
- Bracket Your Shots: Capture multiple exposures of the same scene at different brightness levels (one darker, one neutral, one brighter). This technique, known as bracketing, provides maximum flexibility for blending in post-production to create a perfectly exposed final image, a core component of many interior design photography tips.
For a deeper dive into controlling and shaping light for interiors, this video offers excellent visual examples and professional insights:
2. Proper Use of Wide-Angle Lenses for Room Context
Wide-angle lenses are indispensable tools in interior design photography, enabling you to capture the full scope and context of a space in a single frame. These lenses, typically in the 14-35mm range, are crucial for showcasing how rooms connect and flow, which is essential for real estate listings and architectural portfolios. However, their power comes with a major caveat: perspective distortion. Mastering the wide-angle lens means maximizing its ability to convey space while carefully managing its tendency to warp and exaggerate proportions, ensuring the final image feels expansive yet realistic.
Why Managing Perspective is Non-Negotiable
Improper use of a wide-angle lens can make a room look distorted and unnatural, undermining the designer's intent and misleading potential buyers. For example, a 14mm lens used incorrectly can make a standard bedroom look like a cavernous hall, with furniture near the edges appearing stretched and disproportionate. Conversely, a well-managed 24mm shot can perfectly illustrate the layout of an open-concept kitchen and living area, giving viewers an accurate sense of the home's flow and functionality. The goal is to create an image that feels spacious without sacrificing authenticity, a key principle of high-quality interior design photography tips.
Actionable Wide-Angle Lens Tips
To capture stunning, context-rich interior shots without distracting distortion, apply these professional techniques:
- Keep the Camera Level: Use a tripod equipped with a bubble level to ensure your camera is perfectly parallel to the floor. This prevents vertical lines from converging, which is the most common and jarring form of wide-angle distortion.
- Shoot from the Right Height: Position your camera at a natural eye level, typically around 4.5 to 5 feet (1.4 to 1.5 meters) high. This creates a realistic perspective that makes the viewer feel like they are standing in the room.
- Avoid the Widest Extremes: While a 16mm lens can capture everything, it often introduces too much distortion. Lenses in the 24-28mm range often provide a better balance between a wide field of view and a more natural look.
- Utilize Lens Correction Software: In post-processing, use the lens correction profiles in Adobe Lightroom or similar software. These tools are designed to automatically fix the specific distortion and vignetting caused by your lens, instantly straightening lines and improving image quality.
For a practical demonstration on how to correct perspective and lens distortion in post-production, this tutorial is an excellent resource:
3. Strategic Camera Positioning and Composition Framing
Beyond just pointing and shooting, professional interior photography relies on intentional camera placement and composition to guide the viewer’s eye. Strategic positioning transforms a simple documentation of a room into a compelling visual narrative that highlights key design elements, establishes hierarchy, and showcases the property's flow. This methodical approach is essential for creating dynamic, balanced imagery that elevates a design portfolio or real estate listing.
Why Composition is Non-Negotiable
Intentional composition is what separates a sterile snapshot from an engaging architectural photograph. A well-composed shot can make a small room feel spacious or draw attention to a specific high-value feature, like a custom fireplace or a scenic window view. For example, using a doorway to frame a master bedroom creates leading lines that establish depth, while symmetrical framing in a modern office can emphasize its clean, architectural precision. Mastering composition ensures your images tell the intended story of the space.
Actionable Composition Tips
To improve the visual impact of your interior photos, apply these framing and positioning techniques:
- Scout for Angles: Spend 10-15 minutes in each room before setting up your tripod. Identify the best lines, potential frames, and key focal points to build your composition around.
- Lock in Your Frame: Always use a sturdy tripod. This allows you to lock in a precise composition, make micro-adjustments, and shoot bracketed exposures without any shift in framing.
- Follow the Rule of Thirds: Position key elements like furniture, windows, or doorways along the intersecting lines of a 3x3 grid. This creates a more balanced and visually interesting image than a center-weighted shot.
- Shoot Multiple Perspectives: For each key room, capture a variety of shots. Combine a wide, establishing shot with medium shots and detailed close-ups to provide a comprehensive visual tour for clients.
For those looking to build on these fundamentals, understanding the core tenets of architectural photography can provide a deeper appreciation for line, form, and space. You can find more tips for architectural photography to further refine your compositional skills.
4. Post-Processing and Color Grading for Consistency
Post-processing is the crucial final stage that transforms a technically good photograph into a polished, professional deliverable. It involves refining exposure, correcting color, and enhancing details to align the final image with a specific creative vision or brand identity. A consistent post-processing and color grading workflow ensures that every image in a set, from the kitchen to the master suite, feels cohesive and maintains a high standard of quality. This step is what separates a collection of photos from a curated, compelling visual story.
Why Consistency in Editing Matters
A consistent editing style builds your brand as a photographer and ensures clients receive a predictable, high-quality product every time. For instance, luxury properties often benefit from warm, rich color grading to emphasize elegance and comfort. Conversely, commercial spaces might require a clean, neutral palette to convey professionalism and accuracy. By developing a distinct style, you create a signature look that attracts your ideal clients and makes your work instantly recognizable. This is a non-negotiable part of delivering a professional portfolio.
Actionable Post-Processing Tips
To develop a streamlined and effective editing process, implement these professional techniques into your workflow:
- Establish a Baseline: Use a gray card or white balance card during your shoot to capture a reference shot. This makes achieving accurate and consistent color across all images in post-production significantly faster.
- Develop Presets: Create or purchase presets in software like Adobe Lightroom or Capture One. Having presets tailored for different lighting conditions (e.g., "Daylight Interior," "Twilight Exterior") can accelerate your workflow dramatically.
- Follow a Global-to-Local Workflow: Begin by applying global adjustments like exposure, contrast, and white balance to the entire image. Only after these are set should you move on to selective adjustments, such as brightening a dark corner or reducing highlights in a window.
- Calibrate Your Monitor: Invest in a monitor calibration tool to ensure the colors you see on your screen are accurate. This prevents delivering images that look different on the client’s devices, a key detail in professional interior design photography tips.
For a comprehensive walkthrough on editing interior photos from start to finish, the tutorial below offers valuable insights:
5. Staging and Decor Consultation for Enhanced Appeal
Strategic staging is the art of arranging furniture, decor, and accessories to highlight a property's best features and create an emotional connection with potential buyers. More than just cleaning, staging is a marketing tool that helps define spaces and showcase their potential. As an interior photographer, providing staging guidance or collaborating with professional stagers can dramatically elevate the final images, directly impacting a property's perceived value and appeal in a competitive market.
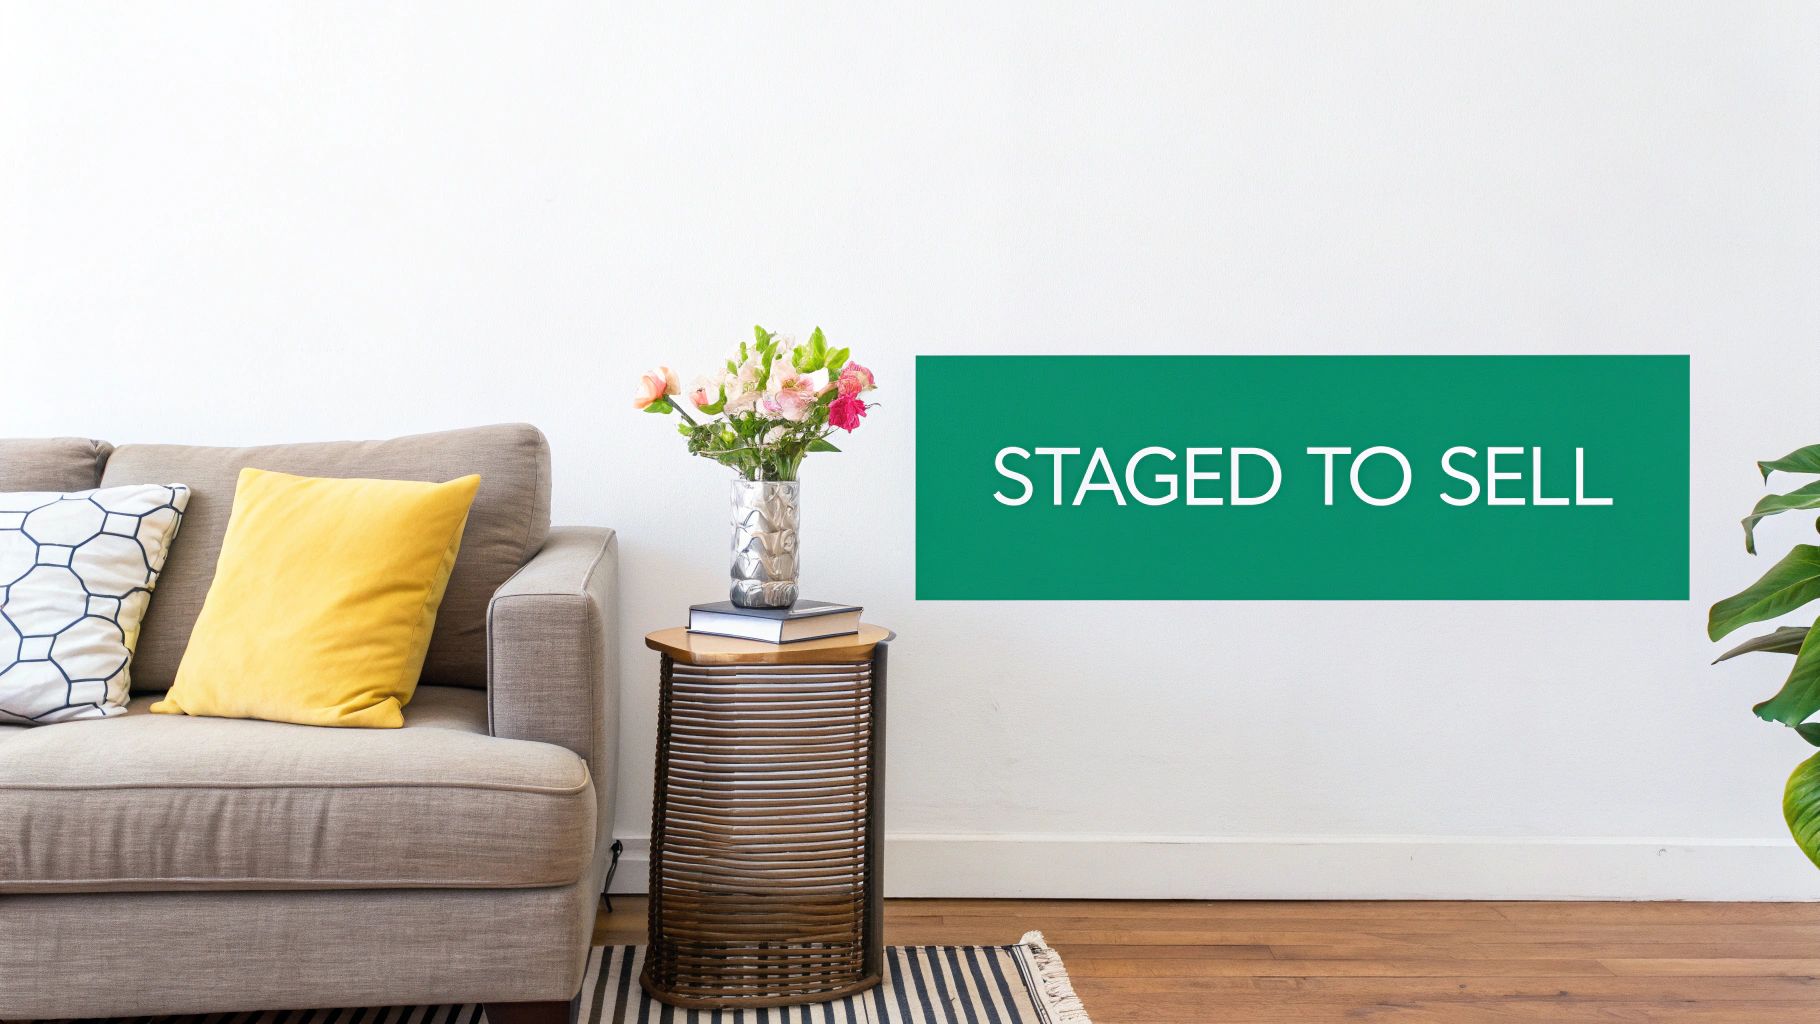
Why Staging is Non-Negotiable
A well-staged room translates into a more compelling photograph. Staging helps guide the viewer's eye, create a sense of scale, and tell a story about the lifestyle the space offers. For example, a vacant luxury home staged with premium rental furniture creates aspirational imagery, while a styled rental property emphasizes its cleanliness and functional appeal. This deliberate preparation ensures every shot communicates maximum value and helps viewers envision themselves living in the space.
Actionable Staging Tips
To help your clients prepare their properties for a successful shoot, integrate these staging-focused interior design photography tips into your process:
- Provide a Pre-Shoot Checklist: Send clients a simple guide with staging recommendations a few days before the shoot. Include reference photos and focus on decluttering, cleaning, and neutralizing the space.
- Emphasize Depersonalization: Advise clients to remove personal items like family photos, refrigerator magnets, and branded merchandise. This creates a blank canvas that appeals to a broader audience.
- Suggest Simple, High-Impact Updates: Small changes yield big results. Recommend adding fresh flowers or a bowl of fruit, putting out new towels in bathrooms, and ensuring all linens are clean and wrinkle-free.
- Create Clear Focal Points: Use color, texture, and strategic decor placement to create a strong focal point in each room. This could be a piece of art over a fireplace or a colorful accent pillow on a neutral sofa.
- Collaborate with Professionals: On high-value properties, recommend a professional stager. Building referral partnerships with stagers can add significant value to your service offerings and result in better portfolio images for everyone involved.
6. HDR and Exposure Blending for High-Contrast Scenes
High dynamic range (HDR) imaging and exposure blending are essential techniques for solving one of the most common challenges in interior photography: balancing the bright light from windows with the darker, ambient-lit interior. By merging multiple images taken at different exposure levels, photographers can create a single, perfectly balanced photo that retains detail in both the darkest shadows and the brightest highlights. This method is critical for showcasing a property’s view without sacrificing the clarity and detail of its interior design.
Why Exposure Blending is Crucial
A camera's sensor cannot capture the same wide range of light that the human eye can. In a high-contrast room, a single exposure will force a choice: expose for the bright window and plunge the room into darkness, or expose for the room and completely blow out the view. HDR and exposure blending eliminate this compromise. The resulting image feels natural and comprehensive, allowing potential buyers or clients to appreciate both the interior space and its connection to the outside world, a key element in effective interior design photography.
Actionable Blending Tips
To master high-contrast scenes, incorporate these exposure blending strategies into your process:
- Use Auto-Bracketing: Set your camera to automatically capture a sequence of 3 to 5 exposures at different brightness levels (e.g., -2, 0, +2 EV). This ensures you have all the data needed for a seamless blend.
- Stabilize with a Tripod: A sturdy tripod is non-negotiable. It guarantees that every frame in your bracketed sequence is perfectly aligned, which is essential for a sharp, ghost-free final image.
- Lock Your Focus: Use manual focus to set your focal point and prevent the camera from refocusing between shots. A slight shift in focus can ruin the blend.
- Merge in Software: Use the "Photo Merge > HDR" feature in Adobe Lightroom for a natural-looking blend, or dedicated software like Photomatix for more stylized control. Start with subtle settings and adjust as needed. For more in-depth guidance, exploring a dedicated guide on HDR photography for real estate can provide advanced techniques.
7. Specialized Equipment Investment: Cameras, Lenses, and Stabilization
Investing in professional-grade equipment is a foundational step in producing high-end interior photography. Your camera, lenses, and stabilization tools are the instruments that capture the designer's vision. A full-frame DSLR or mirrorless camera with a high-resolution sensor, paired with a rectilinear wide-angle lens and a sturdy tripod, allows for technically flawless and visually striking images. This gear enables you to capture sharp details, manage challenging lighting, and maintain perfect composition, directly impacting your work's quality and your professional credibility.
Why Quality Gear is Essential
The right equipment separates professional results from amateur snapshots. A high-megapixel camera like the Sony A7R IV captures immense detail, allowing for large prints and cropping flexibility. Specialty lenses, such as Canon's tilt-shift series, correct perspective distortion, ensuring walls and architectural lines remain perfectly straight. This level of technical precision is non-negotiable for architects and designers. Using professional gear signals to clients that you are serious about your craft, justifying higher rates and building a reputation for excellence.
Actionable Equipment Tips
To build a professional and efficient kit, focus on these strategic equipment investments:
- Prioritize a Quality Wide-Angle Lens: Before buying multiple lenses, invest in one exceptional wide-angle lens, such as a 16-35mm or a 24mm prime. A high-quality wide lens is the workhorse for most interior shots.
- Invest in a Rock-Solid Tripod: Choose a sturdy tripod and a reliable ball head. This is crucial for maintaining sharpness in long exposures, bracketing shots perfectly, and keeping horizons level.
- Build Redundancy: Always carry backups. Having a spare camera body, extra batteries, multiple memory cards, and a secondary trigger can save a shoot from disaster.
- Rent Before You Buy: For high-value projects that require specialized gear like a tilt-shift lens, consider renting. This allows you to deliver premium results without the significant upfront investment, making it one of the most practical interior design photography tips for managing costs.
8. Vertical Panorama and 360° Immersive Photography
Moving beyond traditional still images, immersive formats like vertical panoramas and 360° spherical photography offer a comprehensive view of an interior space. These techniques capture the full scope of a room, showcasing spatial relationships, vertical height, and the complete environment in a way a single frame cannot. This advanced approach creates an engaging, interactive experience for viewers, providing a modern media asset that helps agents, designers, and builders differentiate their listings and portfolios.
Why Immersive Formats are a Game-Changer
Immersive photography meets the growing client demand for comprehensive property visualization. For example, luxury residential clients use 360° tours to give remote buyers an accurate feel for the property, while commercial real estate agents leverage panoramas to showcase expansive office layouts. These formats are not just a novelty; they are powerful marketing tools that can increase engagement and drive conversions. Offering these specialized skills is a valuable market differentiator for any professional photographer.
Actionable Immersive Photography Tips
To integrate these formats into your services, follow these professional interior design photography tips:
- Invest in a Panoramic Head: A quality panoramic tripod head is essential for smooth, precise rotation. This ensures perfect alignment and minimizes stitching errors in post-production.
- Shoot Vertical Panoramas for Height: To capture tall ceilings or dramatic two-story rooms, shoot multiple vertically-oriented images and stitch them horizontally. This technique maximizes vertical coverage and creates a sense of grandeur.
- Lock Your Exposure: Set your camera to full manual mode (M). Meter for the scene and lock in your aperture, shutter speed, and ISO to ensure consistent exposure across all segments of your panorama.
- Overlap Your Shots: Ensure a 30-40% overlap between each frame. This gives your stitching software plenty of data to work with, resulting in a seamless and natural-looking final image.
- Integrate with Tour Platforms: Deliver your 360° photos through platforms like Matterport or other specialized services. To explore your options, learn more about the best virtual tour software for real estate and how it can elevate your client offerings.
9. Architectural Detail and Material Closeup Photography
Compelling interior photography extends beyond wide-angle room shots to capture the essence of a space through its details. This technique involves focusing on specific architectural elements, material textures, and design features that communicate quality, craftsmanship, and premium finishes. By highlighting details like custom cabinetry, stone countertops, or unique hardware, these closeups tell a deeper story about the design narrative and justify the property's value, separating standard real estate photos from design-forward, premium marketing.
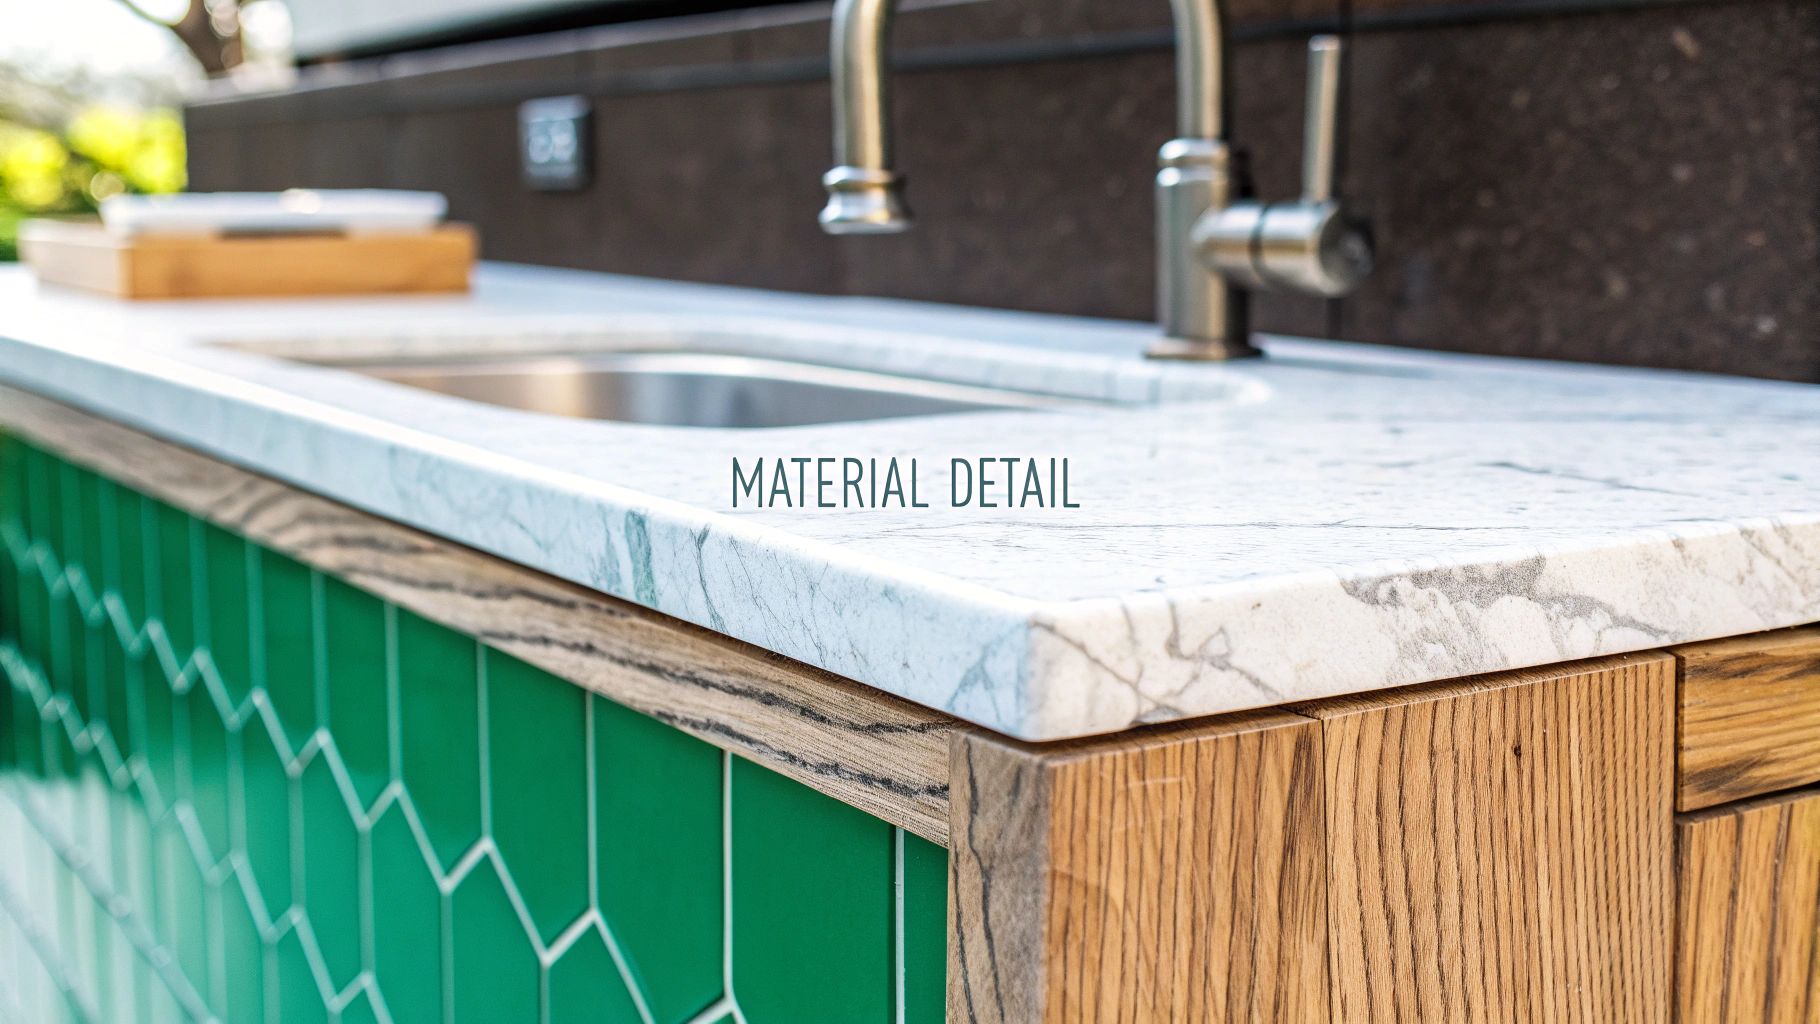
Why Details are Non-Negotiable
Detail shots are critical for evoking a tactile sense of the space and showcasing the investment made in high-end materials. For luxury properties, a macro shot of the veining in a marble island or the joinery of a custom bookshelf elevates the perceived quality. For an interior designer's portfolio, these images are essential proof of their meticulous attention to craft. This focus on the small things builds a powerful visual argument for the property's premium positioning.
Actionable Detail Photography Tips
To effectively capture the small features that make a big impact, apply these focused interior design photography tips:
- Use a Macro or Prime Lens: A 50mm or 100mm prime lens is ideal. These lenses provide a flattering perspective with minimal distortion, allowing you to isolate details without warping their appearance.
- Emphasize Texture with Light: Position your light source to the side of the subject (side-lighting). This raking light creates small shadows across the surface, revealing the texture of wood grain, stone, or fabric.
- Maintain a Consistent Aperture: Shoot your detail shots at a shallow depth of field, such as f/2.8 to f/5.6. This blurs the background, draws the viewer’s eye directly to the material, and creates a cohesive, professional look across the photo set.
- Create Visual Vignettes: Don't just shoot a doorknob in isolation. Compose the shot to include a portion of the door and frame, providing context that helps tell a richer story about the design choices.
10. Client Collaboration and Delivery Systems for Professional Workflows
Professional interior photography extends far beyond the final shutter click; it encompasses a seamless client experience from initial consultation to final delivery. Implementing structured collaboration and sophisticated delivery systems is what elevates a photographer from a freelancer to a trusted creative partner. This workflow involves clear communication, collaborative planning, and the use of modern platforms to present and deliver images, ensuring client satisfaction and reinforcing your brand's professionalism.
Why a Professional Workflow is a Game-Changer
A streamlined client management process is non-negotiable for building a sustainable photography business. It minimizes misunderstandings, sets clear expectations, and showcases your commitment to quality at every touchpoint. For instance, an interior designer receiving their project images in a custom-branded, high-resolution gallery from a platform like Pixieset or ShootProof has a far better experience than receiving a simple file-sharing link. This polished presentation builds trust and encourages repeat business and referrals.
Actionable Collaboration and Delivery Tips
To build a professional workflow that impresses clients and protects your time, integrate these key strategies:
- Establish Clear Pre-Shoot Communication: Before the shoot, send a detailed welcome packet or email outlining the timeline, deliverables, and your revision policy. A collaborative shot list is essential for ensuring you capture all critical angles.
- Use Professional Gallery Platforms: Deliver images using secure, elegant online galleries like Pixieset or ShootProof. These platforms allow for custom branding, password protection, and multiple download size options, providing a premium client experience.
- Set Firm Timelines and Revision Limits: Clearly state your turnaround time (e.g., 3–5 business days) in your contract. To maintain profitability, also define your revision process, such as offering one or two rounds of edits included in the initial fee.
- Create a Comprehensive Contract: A solid contract is one of the most vital interior design photography tips for professionals. It should cover usage rights, payment schedules, cancellation policies, and the scope of work to protect both you and your client.
For a look at how professional delivery platforms can transform your client experience, this overview of Pixieset showcases many of the features discussed:
Interior Design Photography: 10-Point Comparison
| Technique | Implementation Complexity 🔄 | Resource Requirements 💡 | Expected Outcomes 📊⭐ | Ideal Use Cases | Key Advantages ⚡ |
|---|---|---|---|---|---|
| Master Lighting Techniques for Interior Spaces | High 🔄🔄🔄 — advanced setups & control | High 💡 — strobes/continuous lights, modifiers, meters, possible assistant | ⭐⭐⭐ 📊 Balanced, inviting images; consistent premium results | Luxury interiors, twilight shoots, marketing materials | Controls mood/dimension; enables consistency; commands premium pricing |
| Proper Use of Wide-Angle Lenses for Room Context | Medium 🔄🔄 — framing + distortion management | Medium 💡 — quality wide lenses, tripod, correction software | ⭐⭐ 📊 Spacious room representation; clear layout depiction | Small rooms, real estate listings, rental marketing | Captures flow and scale; reduces number of shots needed |
| Strategic Camera Positioning & Composition Framing | Medium 🔄🔄 — planning and framing skill | Low–Medium 💡 — tripod, time to scout, minor staging | ⭐⭐⭐ 📊 Engaging, directional images that highlight features | All property types; portfolio differentiation | Guides viewer attention; elevates perceived value |
| Post-Processing & Color Grading for Consistency | Medium–High 🔄🔄🔄 — detailed, repeatable workflow | Medium–High 💡 — Lightroom/Capture One, calibrated monitor, time | ⭐⭐⭐ 📊 Consistent, branded deliverables; efficient batch output | High-volume shoots; brand-focused portfolios | Ensures style consistency; corrects exposure/perspective issues |
| Staging & Decor Consultation for Enhanced Appeal | High 🔄🔄🔄 — coordination with clients/stagers | Medium–High 💡 — staging partners, rentals, time, communication | ⭐⭐⭐ 📊 Increased perceived value; more inquiries and faster sales | Vacant homes, luxury listings, resale properties | Dramatically improves appeal; justifies premium fees |
| HDR & Exposure Blending for High-Contrast Scenes | Medium–High 🔄🔄🔄 — multi-exposure capture & blend | Medium 💡 — tripod, bracketing, HDR software, processing time | ⭐⭐⭐ 📊 Balanced highlights/shadows; retained exterior views | Rooms with bright windows or high contrast lighting | Recovers highlight/shadow detail; essential for premium listings |
| Specialized Equipment Investment (Cameras/Lenses/Stabilization) | Medium 🔄🔄 — gear mastery & setup | High 💡 — full-frame bodies, quality lenses, tripods ($3k–$8k+) | ⭐⭐⭐ 📊 Technical excellence; consistent high-quality output | Professional studios, high-volume photographers | Improves image quality, reliability; supports premium pricing |
| Vertical Panorama & 360° Immersive Photography | High 🔄🔄🔄 — precise capture & stitching | High 💡 — panoramic heads/360 rigs, stitching/hosting platforms | ⭐⭐ 📊 Immersive tours; interactive client experiences | Luxury, commercial listings, virtual tours | Differentiates portfolio; enables remote walkthroughs; premium add-on |
| Architectural Detail & Material Closeups | Medium 🔄🔄 — macro technique and lighting | Low–Medium 💡 — macro/prime lenses, directional lighting, time | ⭐⭐ 📊 Showcases craftsmanship; supports design narratives | Luxury finishes, design portfolios, architect documentation | Highlights material quality; attracts design-focused clients |
| Client Collaboration & Delivery Systems | Medium 🔄🔄 — process and communication | Medium 💡 — gallery platforms, CRM/project tools, admin time | ⭐⭐⭐ 📊 Higher client satisfaction; faster approvals and repeat business | High-volume clients, agencies, long-term partners | Streamlines delivery; protects rights; improves retention and referrals |
Build Your Brand One Perfect Shot at a Time
Mastering the art and science of interior design photography is not a destination but a continuous journey of learning, practice, and refinement. Throughout this guide, we've navigated the essential pillars that elevate a photograph from a simple snapshot to a compelling visual narrative. By now, you understand that a truly captivating interior image is rarely a matter of luck; it's the calculated result of meticulous planning and technical execution. From harnessing the subtleties of natural light and strategically placing artificial sources to choosing the precise lens that captures a room’s scale without distortion, every decision contributes to the final product.
The journey begins with technical proficiency but ultimately thrives on artistic vision. We've explored how strategic camera positioning and the principles of composition transform a space into a balanced, inviting scene. We've also delved into the critical post-processing workflows that ensure color accuracy and tonal consistency, turning a good shot into a great one. These aren't just abstract ideas; they are the practical skills that separate amateurs from professionals who command higher rates and attract more discerning clients.
From Technical Skills to Business Growth
The true value of these interior design photography tips lies in their application. Think of each concept as a tool in your creative arsenal, ready to be deployed to solve specific challenges on site.
- For the high-contrast challenge: You now have HDR and exposure blending techniques to perfectly expose both the bright window view and the shadowed interior details.
- For the demanding client: Your knowledge of shot lists and collaborative workflows ensures you capture every critical angle, detail, and vignette, leaving no room for disappointment.
- For the small, awkward space: You can employ vertical panoramas or select the ideal focal length to create a sense of openness without sacrificing realism.
This comprehensive approach-combining lighting mastery, compositional expertise, gear knowledge, and client management-is what builds a sustainable business. Each stunning image you produce is more than just a deliverable; it’s a powerful marketing asset for your client and a testament to your own brand's quality and reliability. It demonstrates that you don’t just take pictures; you create visual tools that help designers win awards, architects secure new projects, and real estate agents sell properties faster and for higher prices.
Your Path Forward: Practice and Professionalism
The next step is to move from knowledge to action. Don't wait for the perfect project to start implementing these strategies. Practice in your own home. Offer to shoot a friend's newly decorated room. The more you apply these techniques, the more they will become second nature, allowing you to work more efficiently and creatively under pressure.
Remember that your portfolio is your single most important business asset. Every project is an opportunity to add a hero shot that showcases your unique skill set. Focus on curating a body of work that reflects the quality you want to be known for. This commitment to excellence is what will ultimately differentiate you in a crowded market and open doors to higher-value, more creatively fulfilling projects. As you refine your craft, you are not just improving your photography skills; you are building a reputation, one perfect shot at a time.
Ready to turn your exceptional interior photography skills into a thriving business? Showcase your portfolio to a targeted audience of real estate agents, designers, and developers actively seeking professional talent. Join the PropPhoto marketplace to connect directly with clients who value quality and are ready to book their next project.

