A killer real estate video isn't just about fancy editing tricks; it starts with a rock-solid foundation. How you prep your footage before you even think about dropping clips on a timeline is what separates a smooth, creative process from a frustrating, chaotic mess.
This initial organization isn't busywork. It’s the strategic setup that saves you from hunting for lost files, battling laggy playback, and ultimately, lets you focus on telling a compelling story about the property.
Getting Your Footage Ready for the Edit
The best edits are won long before you touch the creative tools. Trust me, jumping straight into an edit without organizing first is a surefire way to waste hours and end up with a video that feels disjointed. A little discipline upfront makes all the difference.
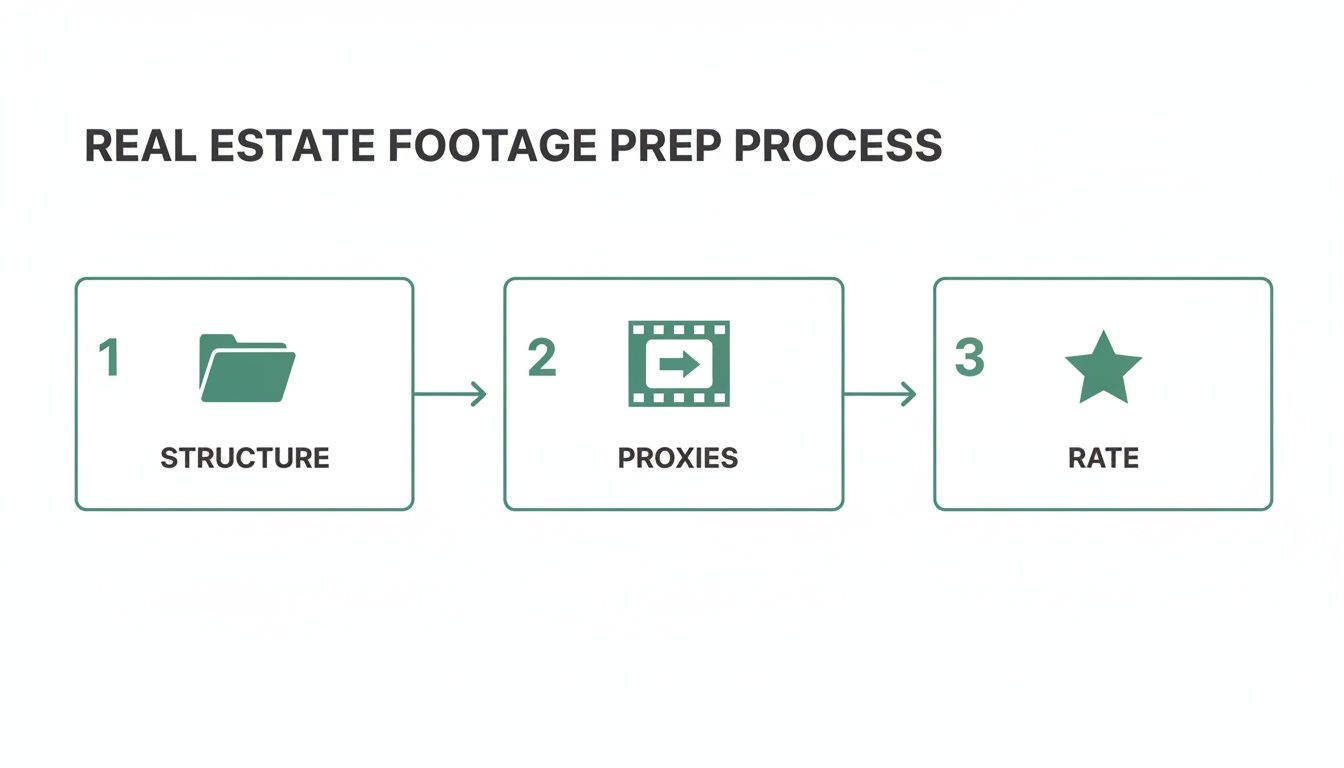
This simple, three-part process—structure, proxies, and rating—is my go-to for every single project. Each step builds on the last, ensuring everything is primed for a smooth and efficient edit.
Build a Logical Folder Structure
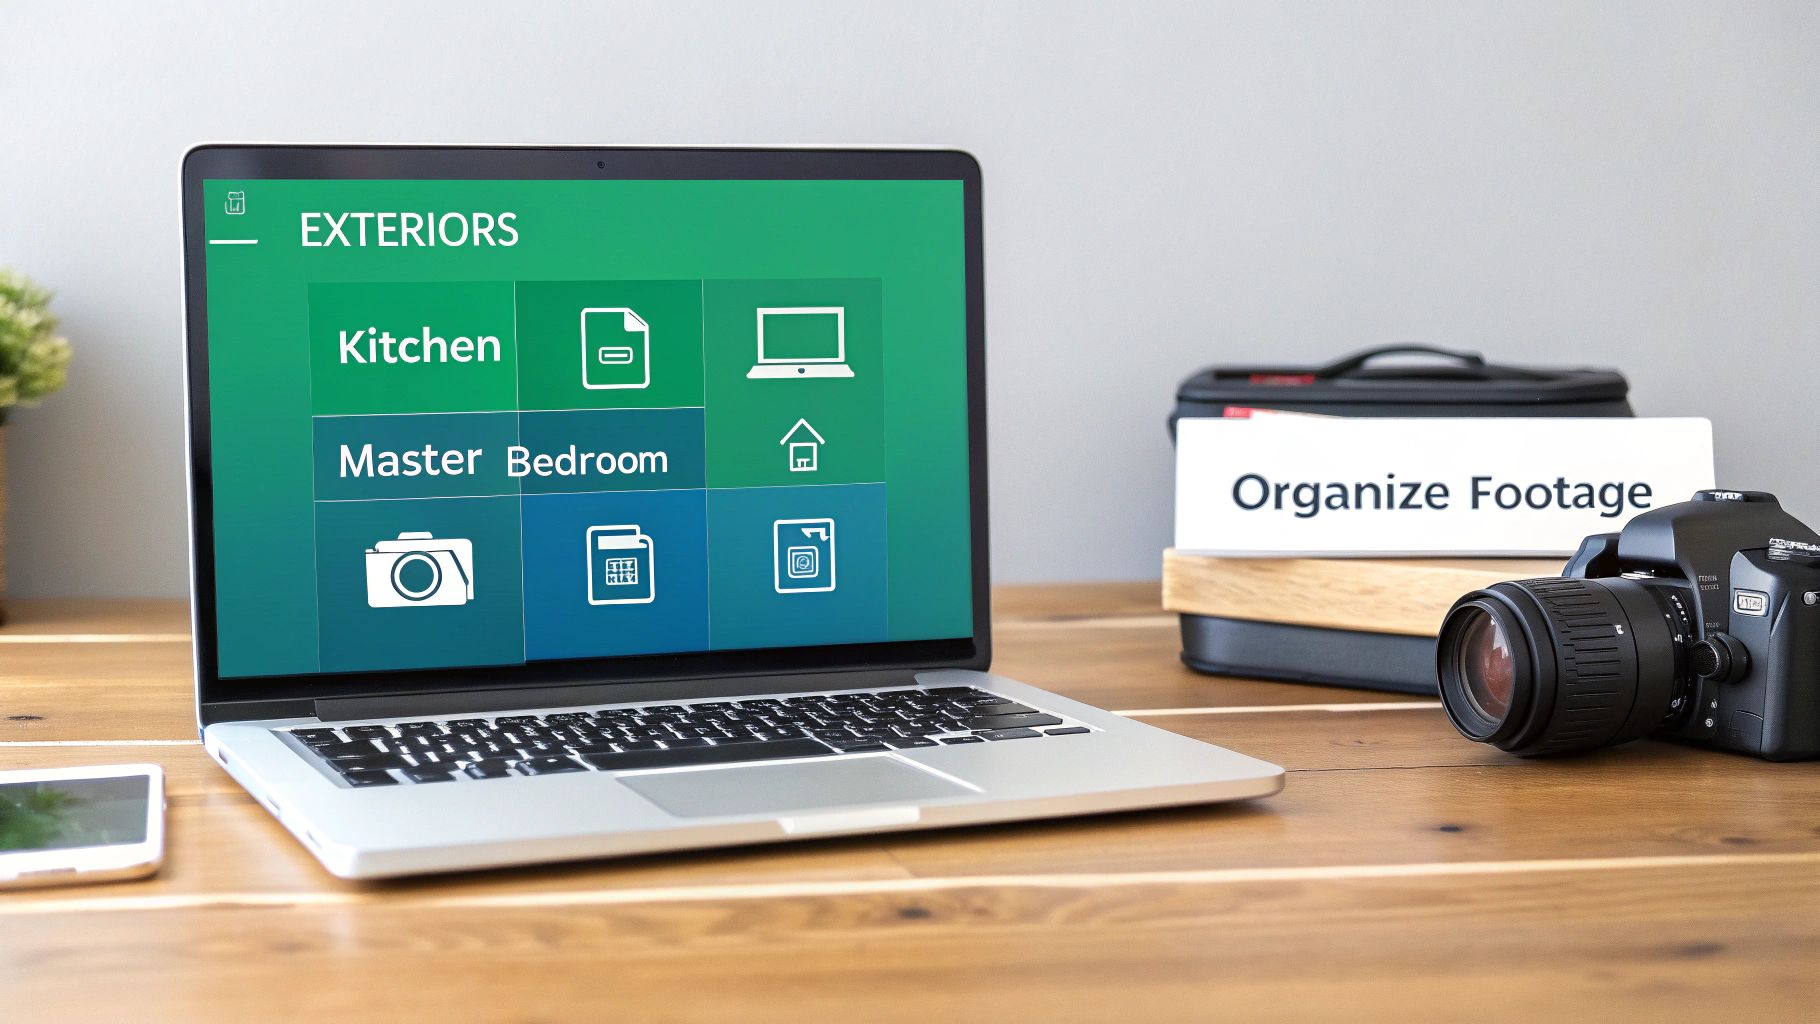
First things first: stop dumping everything into one giant folder. Create a clear, repeatable folder system for every property you shoot. It's a simple habit that will save your sanity.
Here’s the structure I use for every project:
- 01_Project Files: This is where the main editing project file lives (e.g., your Premiere Pro or Final Cut Pro file).
- 02_Footage: The home for all your raw video clips, which needs its own set of subfolders.
- 03_Audio: A dedicated spot for music tracks, voiceover recordings, and any sound effects.
- 04_Graphics: Logos, lower thirds, callouts—any visual asset goes in here.
- 05_Exports: The final destination for all your rendered video files.
I take it a step further inside the 02_Footage folder, breaking it down by room or area. Think "Exteriors," "Kitchen," "Living Room," "Master Bedroom." When the agent asks for one more shot of the kitchen island, you’ll know exactly where to find it in seconds.
Essential Software and Tools for Real Estate Video Editing
Choosing the right tools is just as important as your workflow. Here's a quick rundown of the software that most professionals in the real estate space rely on.
| Tool Category | Recommended Software | Best For | Key Feature for Real Estate |
|---|---|---|---|
| Video Editing (NLE) | Adobe Premiere Pro | All-around professional editing, great integration with other Adobe apps. | The Warp Stabilizer effect is a lifesaver for smoothing out handheld shots. |
| Video Editing (NLE) | DaVinci Resolve | Editors who prioritize advanced color grading and color correction. | Its Color page offers unparalleled control for getting interior whites perfect. |
| Video Editing (NLE) | Final Cut Pro | Mac users looking for a fast, intuitive, and highly optimized editor. | The magnetic timeline makes it incredibly fast to assemble and trim clips. |
| Motion Graphics | Adobe After Effects | Creating custom titles, property line animations, and complex graphics. | The 3D Camera Tracker is perfect for adding text that "sticks" to walls or floors. |
| Proxy Creation | Adobe Media Encoder | Batch processing and creating proxies from various camera formats. | Its preset system makes it easy to create consistent, low-res proxy files. |
| Stock Music | Artlist | Finding high-quality, royalty-free music that fits a property's vibe. | The curated playlists and powerful search filters save a ton of time. |
While the core editing software is essential, tools like a dedicated media encoder and a good music subscription service are what truly complete a professional's toolkit.
Create Proxies for Smooth Playback
Today's cameras shoot beautiful 4K—or even 8K—footage, which is great for quality but brutal on your computer. Trying to edit these massive files natively can turn your workflow into a stuttering, laggy nightmare.
This is where proxies are a total game-changer. Proxies are just low-resolution copies of your original footage. You edit with these small, nimble files, which lets your computer fly. Then, when it’s time to export, the software automatically swaps them back out for the full-quality originals. It's magic.
The time you invest in making proxies is paid back tenfold during the edit. It’s the difference between a fluid, creative session and a frustrating one where you're constantly fighting your computer.
Review and Rate Every Single Clip
With your files neatly organized and your proxies ready to go, the final prep step is the most important: actually watching what you shot. Go through every single clip and give it a rating or a color label.
My system is simple: one color for good, usable shots, another for the absolute "hero" shots, and a third for anything that's unusable (out of focus, too shaky).
This isn't just about sorting files. It’s where you start building the video in your head. You’ll spot that perfect drone reveal, the gorgeous light hitting the countertops, or that stunning sunset view from the patio. This is the moment you bridge the gap from technical prep to creative storytelling, setting you up for a fantastic edit.
For those just getting their feet wet, building these habits early is crucial. You can find more foundational tips in our guide on how to become a real estate photographer.
Crafting a Compelling Visual Narrative
Okay, with all your footage neatly organized, it’s time for the fun part: turning those raw clips into a story. This is where the magic really happens in video editing for real estate. A great property video isn’t just a checklist of rooms; it's an experience. You’re inviting potential buyers to step inside and imagine their life unfolding in that space.
Your job now is to assemble a timeline that builds an emotional connection and follows a logical path through the home.
Think of yourself as a guide. You're directing the viewer's eye, building anticipation, and revealing a lifestyle, not just square footage. The sequence, the pacing, and the interplay between wide views and intimate details are all tools you'll use to build that narrative.
Selecting the Perfect Opening Shot
You have about five seconds to hook someone. That’s it. Your opening shot has to grab their attention immediately and showcase the property's absolute best feature. This is your "hero shot," and it sets the entire mood.
Don't just default to a standard exterior shot. Ask yourself: what's the one thing that makes this property unforgettable?
- Amazing curb appeal? A cinematic drone shot that smoothly flies toward the front door can be incredibly powerful.
- A condo with a killer view? Start on the balcony looking out at the skyline, then pull back to reveal the gorgeous living room it's attached to.
- A big, open floor plan? A slow, sweeping gimbal shot moving from the living room into the kitchen can instantly communicate that feeling of spaciousness.
The idea is to start with a "wow" moment that makes the viewer need to see more. Ditch the slow, boring B-roll at the start and get right to the good stuff.
Sequencing Rooms for a Natural Flow
Once you have them hooked, your next job is to lead them through the property in a way that just makes sense. Think about how you’d actually walk through a house for the first time. A random, jumpy sequence is disorienting and shatters the illusion you're trying to create.
A logical flow usually looks something like this:
- The Entrance: Start at the front door or in the foyer.
- Main Living Areas: Flow into the heart of the home—the living room, dining room, and kitchen.
- The Primary Suite: Show off the main bedroom and its attached bathroom. This is a huge selling point.
- Secondary Rooms: Move on to the other bedrooms, home offices, or bonus rooms.
- Outdoor Spaces: End the tour with the backyard, patio, or pool, often finishing on a beautiful final shot of the whole property.
By sequencing your clips to mimic a real walkthrough, you create a subconscious sense of comfort. It helps viewers mentally map out the layout, making the house feel less like a listing and more like a potential home.
Pacing and Shot Variety
Nobody wants to watch two minutes of slow, sweeping wide shots. It gets old, fast. Keeping your viewer engaged is all about creating a dynamic rhythm through pacing and variety.
The trick is to intersperse your wide, establishing shots with quick, close-up "detail" shots. These are the little moments that add texture and personality.
Look for opportunities to capture things like:
- The beautiful veining in a marble countertop.
- The high-end finish on a kitchen faucet.
- The way sunlight streams through a big window.
- The intricate pattern of custom tile work.
These quick, one-to-two-second detail shots act like visual punctuation. They break up the longer shots, give the viewer’s eye a moment to appreciate the quality of the home, and keep the edit feeling fresh from start to finish. This is a non-negotiable skill for high-quality real estate video editing.
Using J-Cuts and L-Cuts for Seamless Transitions
Ready to make your edits feel truly professional and cinematic? It's time to move beyond basic hard cuts. J-cuts and L-cuts are your secret weapons for creating smooth, flowing transitions.
- J-Cut: The audio from the next clip starts before the video does. For instance, you might hear the sound of a crackling fireplace while you're still looking at the living room, just before the shot cuts to a close-up of the hearth. It builds anticipation beautifully.
- L-Cut: The audio from the previous clip continues over the start of the next one. Imagine the agent's voiceover from the kitchen scene finishing a thought as the video cuts to a gorgeous shot of the backyard. This connects the two spaces seamlessly.
These techniques are subtle, but they have a massive impact. They help blend your shots together, guide the viewer's attention, and make the entire video feel more polished and intentional. Once you master this storytelling phase, you're no longer just making a property tour—you're crafting a compelling invitation.
Bringing Footage to Life with Stabilization and Color
Alright, once you've laid out the basic story of the home on your timeline, it's time to start the real magic. This is where you transform those raw, sometimes shaky, clips into a smooth, cinematic experience that feels polished and high-end. Getting this part right is what makes a property truly shine on screen, turning a simple video into a must-have marketing tool.
The first thing I always tackle is any subtle camera shake. Even when you're using a gimbal, you can still get those tiny, distracting jitters from walking or panning. This is where your editing software becomes your best friend.
Taming Shaky Footage with Warp Stabilizer
Most modern NLEs (Non-Linear Editors) like Adobe Premiere Pro have a fantastic tool called Warp Stabilizer. Applying it is usually as simple as dragging the effect onto your clip. The software gets to work, analyzing the footage frame-by-frame to subtly crop, scale, and reposition everything to smooth out that unwanted movement.
But here’s a pro tip: don't just "set it and forget it." The default settings can sometimes be too aggressive.
- Go Easy on Smoothness: I usually start with a low value, somewhere around 5-10%. If you push it too far, you can get a weird, floaty look or introduce strange warping artifacts, especially during pans.
- Pick the Right Method: "Subspace Warp" is the default and works great most of the time. But if you see bizarre distortions, try switching to "Position, Scale, Rotation." It’s a simpler fix that can be less intensive.
The goal isn't to make every shot look like it was filmed on a locked-down tripod. You just want to remove the distracting micro-jitters that scream "amateur," letting the viewer focus on the beauty of the home.
Correcting Lens Distortion in Interiors
When you're shooting inside a home, you’re almost always using a wide-angle lens (typically in the 16-24mm range) to make rooms feel open and spacious. While these lenses are essential for capturing the whole space, they have one major drawback: distortion. They can make straight lines near the edges of the frame, like walls and doorways, look curved or bent.
This is where Lens Correction is non-negotiable. It’s a simple but vital effect that you'll find in any professional editing suite. Just find the profile for your specific camera and lens combination, apply it, and watch as it magically straightens out those lines. This immediately gives your footage a more professional, architectural look.
The Two Sides of Color: Correction and Grading
With your footage smooth and straight, it's time to tackle color. It's really important to think of this as a two-step process: color correction and then color grading. They are not the same thing.
- Color Correction is the technical part. The mission here is to make the video look "normal"—as the human eye would see it. This means fixing the white balance, nailing the exposure, and making sure the colors are accurate and true-to-life.
- Color Grading is the creative part. After the footage is corrected, you get to add style and create a specific mood. Do you want the home to feel warm and cozy, or bright and airy? This is where you inject personality into the image.
Think of it like this: Correction is applying the primer—creating a clean, neutral base. Grading is picking the final paint color that gives the room its unique feel. You absolutely need the primer before you can paint.
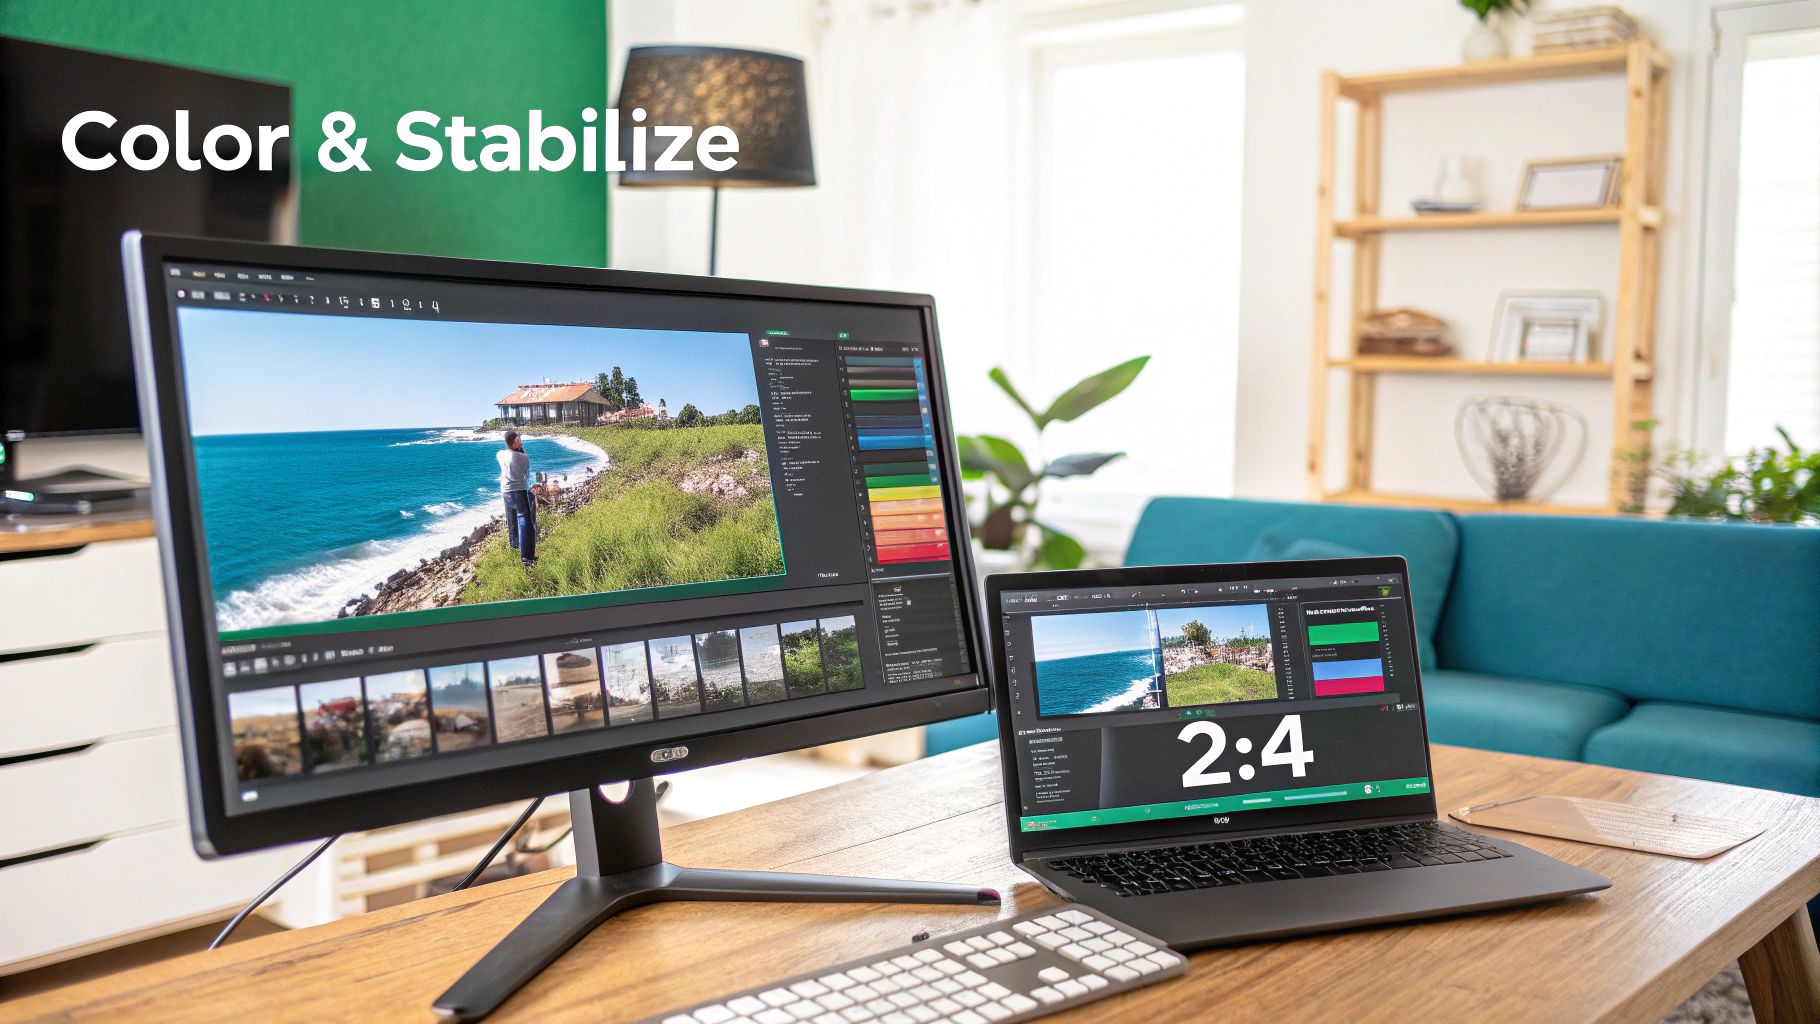
Using Scopes to Get Perfect White Balance
Your eyes can easily be fooled by the colors on your monitor, but the data never lies. That's why I always rely on video scopes, like the Parade (RGB) and Vectorscope, to get my color correction spot-on.
Instead of just eyeballing it, use your scopes to dial in a perfect white balance. Find something in your shot that should be pure white—a wall, a door frame, a kitchen countertop. As you adjust your temperature and tint controls, watch the Parade scope. Your goal is to get the red, green, and blue channels to line up perfectly. When they do, you've achieved a true, neutral white, which makes every other color in the scene fall into place naturally.
Using LUTs for Beautiful Interiors and Exteriors
Once your footage is corrected, you can move on to the fun part: grading. A fantastic way to get a professional look quickly is by using LUTs (Look-Up Tables). A LUT is just a preset color formula you can apply to your footage to give it an instant cinematic style.
In the competitive real estate market, this level of polish makes a huge difference. In fact, property listings with professionally edited videos generate a staggering 403% more inquiries than listings without any video at all. This just goes to show how critical these finishing touches are for grabbing a buyer's attention.
For real estate, I recommend having a couple of go-to LUTs in your toolkit:
- A Warm Interior LUT: Find one that adds a touch of warmth and saturation. This makes interior spaces feel cozy, welcoming, and like a place someone could actually call home. These LUTs often work by slightly warming up the mid-tones and gently lifting the shadows.
- A Vibrant Exterior LUT: For your outdoor shots, especially those epic drone clips, use a LUT that makes the colors pop. You want one that deepens the blues in the sky, enhances the greens in the grass and trees, and adds a clean, bright contrast to the scene. For more on this, check out our guide on real estate drone video.
Mastering these technical enhancements is what truly separates the pros from the amateurs. It’s how you turn a simple walkthrough into an immersive showcase that connects with buyers on an emotional level and helps a property sell itself.
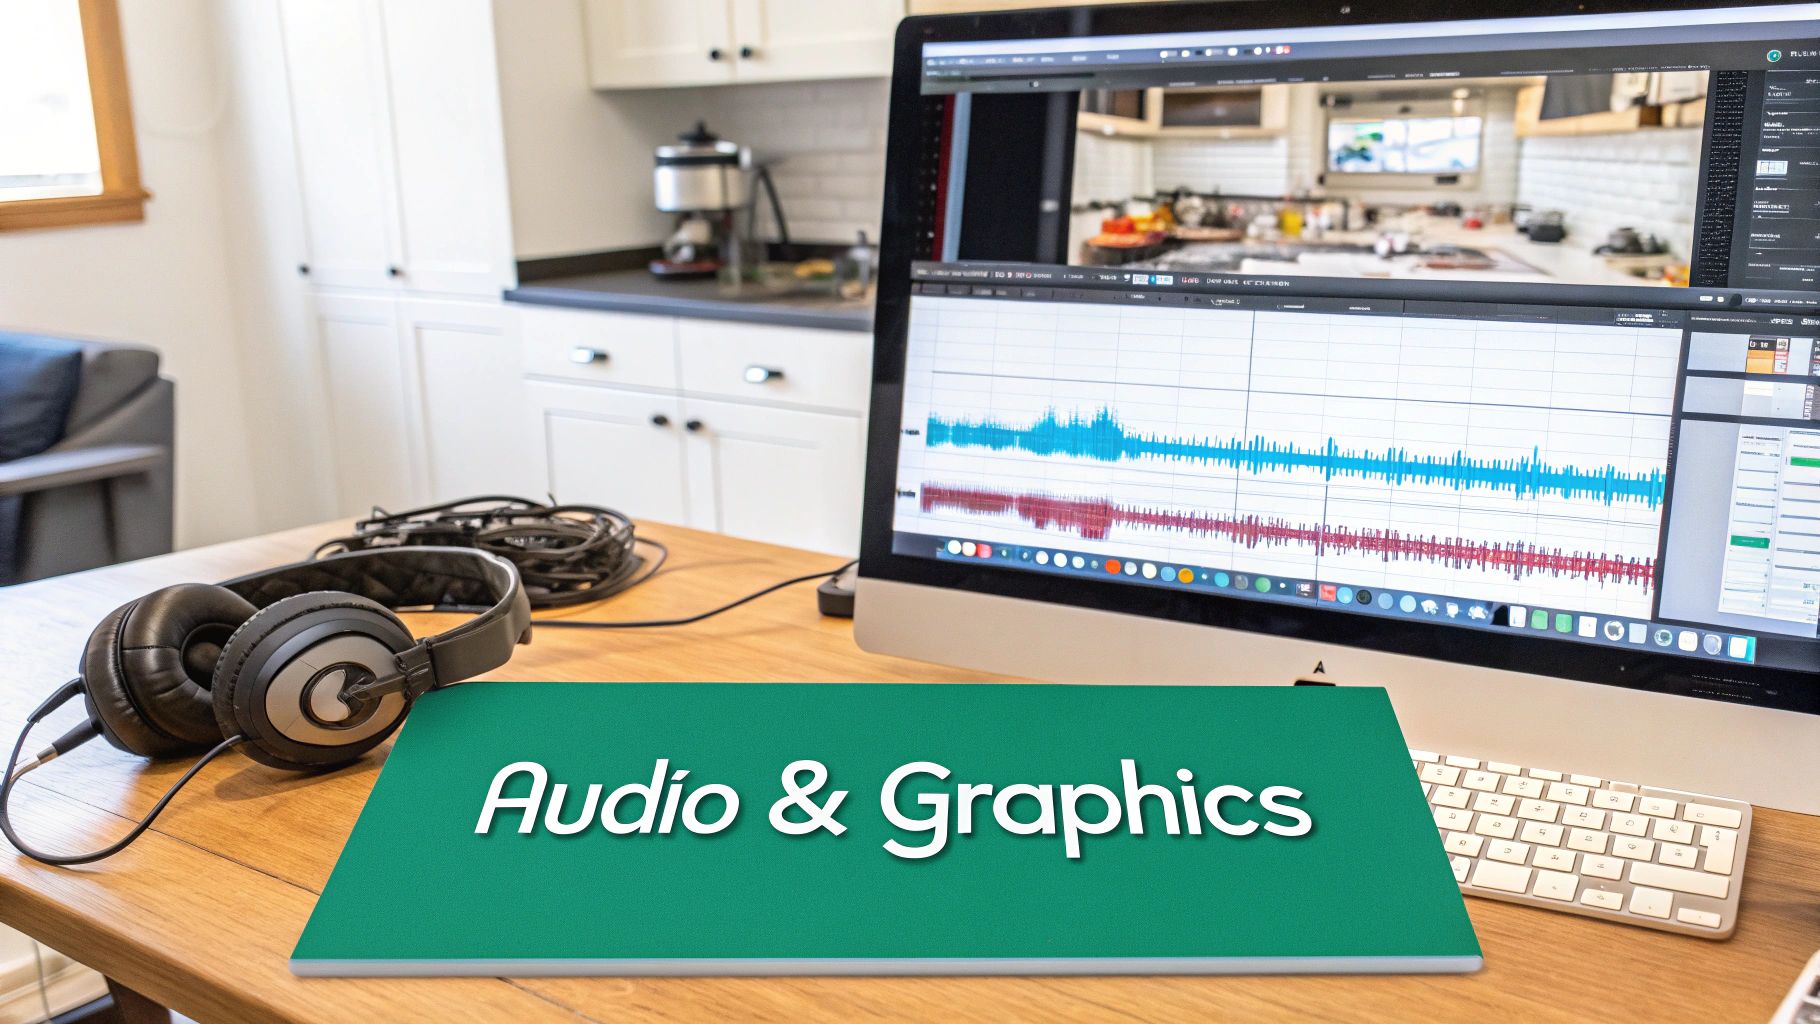
Polishing the Final Cut with Audio and Graphics
You can have the most beautifully shot and perfectly paced video, but without the right audio and on-screen graphics, it just feels incomplete. Once you've locked in the visual flow of your edit, it's time to add that final layer of polish. This is where you build the soundscape and add key information that transforms a simple property tour into a marketing asset that feels truly professional and immersive.
These aren't just minor details. They're essential for guiding the viewer's emotions, highlighting important features, and giving the video a finished, high-end feel that agents and buyers expect in professional video editing real estate projects.
Choosing Music that Matches the Mood
Think of the soundtrack as the emotional heartbeat of your video. The right track can make a home feel vibrant and modern or calm and luxurious. Get it wrong, and the music becomes a major distraction, completely working against your visuals. Always, and I mean always, use licensed music from services like Artlist or Epidemic Sound to avoid any nasty legal surprises down the road.
I always try to match the music to the property’s unique character:
- Modern Condo: Go for something upbeat and electronic. A clean, driving beat helps convey a contemporary, energetic lifestyle.
- Luxury Estate: A sweeping orchestral piece or an ambient cinematic track will instantly add a sense of grandeur and sophistication.
- Cozy Family Home: You can't go wrong with a light, acoustic folk song or a soft pop track. Anything with a warm, inviting melody helps create that feeling of comfort.
And a pro tip: stick to instrumental music. Lyrics are almost guaranteed to pull the viewer's attention away from the property itself.
Mastering Your Audio Mix
Finding the perfect song is only half the battle; you have to mix it correctly. One of the most common mistakes I see is music that's just too loud. It feels aggressive and can cheapen the entire production. The goal is for the music to support the visuals, not scream over them.
As a rule of thumb, I keep my main music levels between -18dB and -24dB. This creates a pleasant background ambiance that adds to the mood without being overpowering. You can bump it up to around -12dB for the intro and outro to grab attention and then fade out nicely.
If you have a voiceover, you'll need to "duck" the audio. This just means the music volume automatically lowers whenever someone is speaking. It ensures the narration is always crisp and easy to understand. Most editing software has tools for this, like the "Essential Sound" panel in Adobe Premiere Pro, which makes it incredibly simple.
Adding Clean and Minimalist Motion Graphics
Graphics are that final layer of information and branding. The key here is to be subtle and professional. Over-the-top, flashy graphics will make a video feel dated faster than anything else. When it comes to real estate, clean and minimalist is always the right call.
Here are the most common graphics I find myself adding:
- Lower Thirds: A simple text overlay, usually in the bottom corner, to identify the agent, their brokerage, and contact info.
- Location Titles: Clean text that introduces key areas of the home, like "Gourmet Chef's Kitchen" or "Private Backyard Oasis."
- Callouts: Small, animated pointers that highlight a specific selling point, like "Quartz Countertops" or "Smart Home Integration."
Always keep the fonts and colors consistent with the agent's branding. It creates a cohesive look and makes the agent look good. The goal is to provide helpful context without ever cluttering the screen.
This final stage of editing is what really drives business. The skill behind great real estate videos is fueling serious growth; marketers using professionally edited video grow their business 49% faster than those who don't. This isn't just a fleeting trend—it’s a proven advantage. It’s why platforms like PropPhoto are so valuable, connecting top-tier editors with agents who need this exact skill set. To get ahead of the curve, you can discover more insights on emerging real estate video marketing trends.
Finalizing and Delivering for Maximum Impact
You’ve locked the edit, nailed the color grade, and the music hits just right. But you're not at the finish line just yet. The final step—exporting and delivering your work—is where a fantastic video can fall apart. Get it wrong, and all that sharp 4K footage turns into a pixelated mess on the platforms where it counts the most.
This isn’t just about clicking "Export." It’s a strategic final check that makes sure your video looks incredible everywhere it’s seen, from the local MLS to a fast-scrolling Instagram feed. Getting this part right is what separates the pros from the amateurs.
Decoding Export Settings for Every Platform
One size definitely does not fit all. Every platform—YouTube, Instagram, the MLS—has its own weird compression quirks and preferred specs. If you just export one master file and upload it everywhere, you’re practically asking for poor quality. The real solution is to create a few tailored versions for each destination.
Here are the practical settings I’ve landed on after years of tweaking for the most common real estate video destinations:
For MLS and YouTube (Your "Hero" File): This is your highest quality version. You want it looking pristine.
- Codec: H.264 is the universal standard.
- Resolution: 1920x1080 (Full HD) is the safe bet. Go with 3840x2160 (4K) only if the agent specifically asks for it and you've confirmed the MLS can handle it.
- Bitrate: For 1080p, I find a target bitrate of 16-20 Mbps is the sweet spot. For 4K, you'll want to bump that up to 40-50 Mbps.
- Frame Rate: Always match your timeline settings (usually 23.976 or 29.97 fps).
For Instagram Feed and Facebook: These platforms are ruthless with compression. You need to give them a high-quality file, but in the specific format they prefer.
- Codec: Stick with H.264.
- Resolution: Go with 1080x1350 (a 4:5 aspect ratio). This vertical format takes up the most screen real estate on a phone, which is exactly what you want.
- Bitrate: A target of 10-15 Mbps is more than enough for mobile viewing.
- Audio: AAC codec at 128 kbps.
By taking a few extra minutes to create these targeted exports, you ensure that the agent's marketing—and your work—looks polished and professional everywhere it gets posted.
Creating Multiple Versions for Modern Marketing
In today's market, a single two-minute walkthrough video just doesn't cut it anymore. Smart agents need a whole arsenal of video assets to properly market a listing. When you can provide these different cuts, you’re offering a massive value-add that sets you way ahead of the competition.
I typically deliver a package with these key versions:
- The Full Walkthrough (2-3 minutes): This is the main event for the MLS, Zillow, and the agent’s website.
- The Social Media Cut (under 60 seconds): A punchy, fast-paced highlight reel set to upbeat music. It's built for the Instagram or Facebook feed.
- The Vertical Story/Reel (15-30 seconds): An even shorter cut, formatted vertically, designed for quick hits on Instagram Stories or Reels.
When you create these variations, you’re not just handing over a video file; you’re delivering a complete marketing package. This proactive approach saves the agent a ton of time and shows you truly understand what they need to succeed.
This kind of professional video editing does more than just make a property look good—it actually helps it sell faster. In fact, properties marketed with edited aerial videos have been shown to sell 68% faster than homes with just photos. That’s a powerful statistic that proves how dynamic footage can be a game-changer in a crowded market.
The Professional Delivery Process
How you send the final files is the last impression you leave with your client. Don't be the person who tries to email a dozen huge video files. It’s clunky, unprofessional, and a guaranteed headache for everyone.
A streamlined delivery process builds trust and makes your client’s life easier, which is the secret to getting repeat business.
Using a dedicated platform like PropPhoto for delivery creates a clean, organized, and branded experience. You send a single, professional link where the agent can view, comment on, and download all the different video versions you’ve made. Everything is in one tidy place, and it makes you look like the organized pro you are. For more on this, check out our in-depth guide to creating a standout real estate video walkthrough.
Ultimately, a polished delivery is the perfect final touch. It reinforces the quality of your work from start to finish and ensures your clients aren't just satisfied, but genuinely impressed.
Answering Your Top Real Estate Video Editing Questions
When you get into the nitty-gritty of editing real estate videos, the same questions tend to pop up again and again. It's one thing to capture great footage; it's another to piece it all together into a polished, professional video that actually helps sell a home.
Let's break down some of the most common hurdles I see photographers run into, from picking the right video length to choosing music that won't get your client a copyright strike. Getting these details right is what separates a forgettable video from one that genuinely connects with a buyer.
How Long Should a Real Estate Video Actually Be?
This is the big one, and the answer is always: it depends entirely on where people are going to see it. Forget the one-size-fits-all approach. You need to edit for the platform.
For the main event—the video tour that's going on the MLS, Zillow, or the agent’s own website—you've got a bit more room to breathe. The sweet spot is between 2 and 3 minutes. That's plenty of time to give a proper tour of the home's key features without viewers starting to check their watches.
But when you're cutting for social media, you have to be ruthless. Attention spans are basically zero.
- Instagram & Facebook Feeds: Think highlight reel. Chop it down to 60-90 seconds of the absolute best shots, set to a faster pace.
- Instagram Reels & TikTok: This is where you go for the quick hit. A 15-30 second vertical cut is all you need. It’s about grabbing attention with quick, dynamic shots that get people to stop scrolling.
What’s the Best Music for Property Videos?
Music is what gives a property video its soul, but it's also a legal minefield. The golden rule is simple: always use royalty-free music. Seriously. Sourcing your tracks from a reputable service protects both you and your client from nasty copyright claims.
The vibe of the music should always match the house. A sleek, modern downtown condo? An upbeat electronic track usually works wonders. A sprawling luxury estate in the country? Sweeping, cinematic, and ambient is the way to go.
The key is to let the music set a mood, not steal the show. Stick to instrumental tracks—lyrics are a huge distraction and can make a video feel dated and cheap.
How Do I Make My Interior Shots Look Brighter?
We all want those bright, airy interiors that look like they're straight out of a magazine. While a lot of it happens in-camera, the real magic is in the edit. First things first: if you shot on a wide-angle lens (think 16-24mm), your first move in post should always be applying lens correction to get rid of that subtle (or not-so-subtle) fisheye distortion.
From there, it’s all about color. Gently lift the shadows to bring out the details hiding in the darker corners, but be careful not to make things look flat or washed out. Then, nail your white balance. This is non-negotiable for making walls look clean and colors feel true. A tiny boost in saturation can make things pop, but a light touch is everything. You want it to look natural, not cartoonish.
What Are the Biggest Editing Mistakes to Avoid?
Even pros slip up sometimes, but a few common mistakes can instantly scream "amateur." Knowing what they are is half the battle.
If I had to name the top culprits, they would be shaky footage, colors that change from room to room, and bad audio. Nothing kills a great video faster than music that’s too loud or just completely wrong for the vibe.
Beyond those big three, watch out for pacing that drags—if it feels slow to you, it’s definitely too slow for a potential buyer. Also, resist the urge to use cheesy, distracting transitions; a clean, simple cut almost always looks more professional.
And maybe the biggest face-palm moment of all? Ruining a perfectly good edit by exporting with the wrong settings. A single misstep here can leave your video looking pixelated and glitchy on the very platforms you made it for.
Ready to connect with real estate agents who value high-quality video? Join PropPhoto today to build your professional profile, get discovered by local clients, and keep 100% of your earnings. Start landing better real estate media jobs.

